Have you ever watched a video where time speeds up, clouds race across the sky, or a bustling cityscape transforms, all while the camera glides smoothly through the scene? This captivating technique is known as a motion time-lapse, and with the right approach, you can create breathtaking sequences that elevate your storytelling. Gone are the days of static time-lapses; today’s gimbals unlock a new dimension of dynamic movement, making your footage more immersive and professional. This comprehensive guide will walk you through everything you need to know, from understanding the basics and choosing your gear to mastering shooting techniques and troubleshooting common issues, ensuring your motion time-lapses are nothing short of stunning.
What is a Motion Time-lapse, and Why Should You Master It?
A motion time-lapse is a sophisticated photographic technique that combines traditional time-lapse photography with dynamic camera movement. Unlike a standard time-lapse, where the camera remains stationary, a motion time-lapse involves the camera moving along a pre-programmed path during the capture process. This movement can include subtle pans, tilts, or even a slow, creeping dolly shot, adding a layer of cinematic fluidity that brings static scenes to life. This creates a more engaging visual experience, transforming mundane events into dramatic narratives.
Mastering motion time-lapses allows you to condense long periods into short, impactful video clips, revealing changes that are often imperceptible to the naked eye. Imagine capturing a flower blooming, a crowd gathering in a plaza, or the intricate dance of shadows and light across a landscape, all with a smooth, controlled camera motion. This technique isn’t just visually appealing; it enhances your storytelling, offering a professional touch that static shots simply can’t achieve. It’s an invaluable skill for filmmakers, vloggers, and content creators looking to make their work stand out.
Essential Gear for Motion Time-lapse Photography
Creating compelling motion time-lapses begins with selecting the right equipment. Your gear setup will dictate the quality, stability, and creative possibilities of your shots. Understanding the interplay between your camera, gimbal, and essential accessories is crucial for success.
Camera Compatibility
The type of camera you use significantly influences your gimbal choice and overall workflow.
- DSLR/Mirrorless Cameras: These cameras offer the highest image quality, robust manual controls, and interchangeable lenses, providing maximum flexibility for motion time-lapses. They are ideal for professional results but require more substantial gimbals with higher payload capacities. Popular models include Sony Alpha series, Canon EOS, and Fujifilm X series.
- Action Cameras (e.g., GoPro, DJI Osmo Action): Compact and durable, action cameras are excellent for rugged environments or when a small footprint is necessary. While some have built-in stabilization, a dedicated gimbal enhances their capabilities, especially for smooth motion paths. They typically have simpler controls but are great for dynamic, fast-paced scenes.
- Smartphones: Modern smartphones boast impressive camera capabilities and are incredibly convenient. Paired with a smartphone gimbal, they can produce surprisingly high-quality motion time-lapses, making them perfect for beginners or casual creators. Apps often simplify the process of setting intervals and motion paths.
|
Our Picks for the Best Camera Stabilizer in 2026
As an Amazon Associate I earn from qualifying purchases.
|
||
| Num | Product | Action |
|---|---|---|
| 1 | Zeadio Camera Stabilizer Kit, All-in-One Handheld Stabilizer with LED Video Light, Microphone, Phone Holder & Action Camera adaper, Fits for All Camera, DSLR, Action Camera and All Smartphones |

|
| 2 | Zeadio Video Action Stabilizing Handle Grip Handheld Stabilizer with Cold-Shoe Mount for All DSLR Camera Camcorder |
|
| 3 | ZHIYUN CINEPEER Weebill 3E [Official], 3-Axis Lightweight Gimbal Stabilizer for DSLR & Mirrorless Camera Canon/Sony/Panasonic/Nikon, 3KG Payload, Native Vertical Shooting, Bluetooth Shutter Control |
|
| 4 | DJI Osmo Mobile 7P Gimbal Stabilizer for iPhone, Android, Native Tracking, Lighting, 3-Axis Phone Gimbal, Quick Launch, One-Tap Edit, Built-in Extension Rod & Tripod, 10hrs Use, Phone Charging |
|
| 5 | FeiyuTech SCORP 3 Gimbal Stabilizer for Camera, Built-in AI Tracking Sensor & Detachable Remote Control, 3.5KG Payload Camera Stabilizer with Touch Screen, Vertical Shooting |
|
| 6 | 3-Shoe DSLR/Mirrorless/Action Camera Camcorder Phone Stabilizer Expansion Cage Mount Moviemaking Holder Rig YouTube Tiktok Vlogging Video Kit Compatible with GoPro Canon Nikon Sony iPhone Android |
|
| 7 | DJI RS 3 Mini, 3-Axis Gimbal Stabilizer for Cameras Canon/Sony/Panasonic/Nikon/Fujifilm, 2 kg (4.4 lbs) Tested Payload, Camera Gimbal with Native Vertical Shooting, Black |
|
| 8 | DJI Osmo Mobile 8 Advanced Tracking Combo Gimbal Stabilizer for Phone, AI Native Tracking with Audio & Lighting, 360° Pan Rotation, Built-in Extension Rod & Tripod, 10h Battery, Extension Rod |
|
| 9 | FeiyuTech SCORP 2 Gimbal Stabilizer for DSLR and Mirrorless Camera, Integrated Al Tracking Sensor, 3-Axis Camera Stabilizer for Sony Canon Panasonic Nikon, 2.5kg Payload Touch Screen Vertical Shooting |
|
| 10 | DJI Osmo Mobile 7 Gimbal Stabilizer for iPhone, Android, Built-in Tripod, Portable Stabilizer for iPhone, Selfie Stick, 3-Axis Phone Gimbal, ActiveTrack 7.0, One-Tap Edit, 10hrs Use, Phone Charging |
|
Choosing the Right Gimbal
Your gimbal is the heart of your motion time-lapse setup, ensuring silky-smooth movements.
- Payload Capacity: This is perhaps the most critical factor. Your gimbal must be able to comfortably support the combined weight of your camera and lens. Overloading a gimbal leads to poor stabilization, motor strain, and reduced battery life. Always check the manufacturer’s specifications.
- Battery Life: Motion time-lapses can run for hours, so a gimbal with extended battery life is essential. Look for models offering 10+ hours of operation, or consider those with swappable batteries or the ability to be powered externally.
- Features: Many gimbals come with dedicated time-lapse or motion-lapse modes, allowing you to easily program start and end points and define the interval. Features like automated axis locks, built-in screens, and intuitive app control enhance the user experience. Some gimbals even include AI tracking or integrated fill lights for added versatility.
Accessories for Enhanced Results
Beyond the camera and gimbal, certain accessories can greatly improve your motion time-lapse workflow.
- Sturdy Tripod: While gimbals provide motion, a stable tripod is often needed to mount your gimbal and camera for static or slow-moving shots, especially when doing a time-lapse that runs for an extended duration.
- External Power Bank: For longer shoots, an external power bank can be a lifesaver, extending your gimbal’s operational time.
- ND Filters (Neutral Density Filters): These are crucial for controlling exposure in bright conditions, allowing you to use slower shutter speeds to achieve motion blur without overexposing your images.
- Remote Control/App: Most modern gimbals come with a companion smartphone app or a dedicated remote controller, enabling precise control over motion paths and settings without touching the gimbal itself, minimizing vibrations.
- Intervalometer: While many gimbals have built-in intervalometers, an external one offers greater control over camera settings for advanced users, especially with older cameras or gimbals without integrated time-lapse functions.
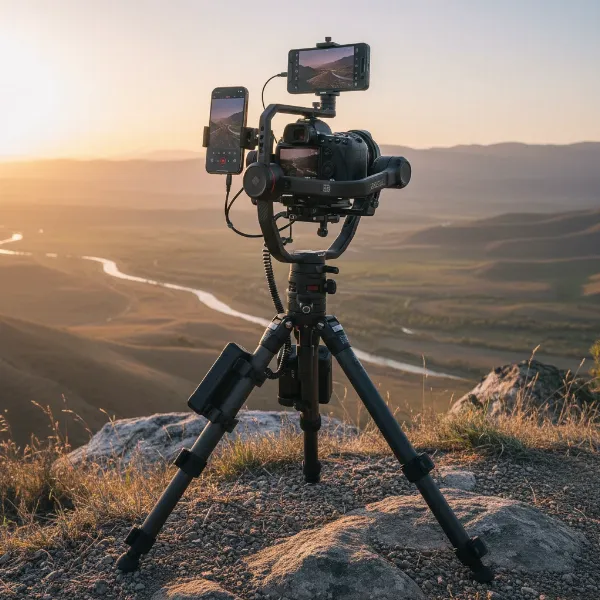 A balanced camera and gimbal setup on a tripod ready for a motion time-lapse, with a remote control visible.
Step-by-Step Guide to Shooting a Motion Time-lapse
Creating a stunning motion time-lapse involves meticulous planning and precise execution. By following these steps, you can ensure your footage is smooth, captivating, and professional.
Balancing Your Gimbal and Camera
Proper balancing is the cornerstone of any smooth gimbal shot, including motion time-lapses. An unbalanced gimbal will strain its motors, lead to shaky footage, and quickly drain its battery.
- Mount Your Camera: Securely attach your camera to the gimbal’s quick-release plate. Ensure it’s centered and snug.
- Rough Balance: Unlock all three axes (tilt, roll, pan). Start by balancing the tilt axis (forward/backward movement). If the camera tips forward or backward, adjust its position until it stays level when tilted to any angle.
- Fine-tune Roll and Pan: Next, balance the roll axis (side-to-side movement) and finally the pan axis (horizontal rotation). The goal is for the camera to remain motionless in any position you set it, without motor assistance.
- Auto-Tune (if available): Many gimbals offer an auto-tune function through their app. This feature fine-tunes the motor strength to perfectly match your camera’s weight, optimizing performance and stability.
Setting Up Your Motion Path
The “motion” in motion time-lapse comes from the carefully choreographed movement of your gimbal. Most gimbals facilitate this through their dedicated apps.
- Access Time-lapse Mode: Open your gimbal’s companion app (e.g., DJI Ronin App, Hohem Joy App, DJI Mimo App) and navigate to the time-lapse or motion-lapse mode.
- Define Start and End Points: This is where you program the camera’s movement. You’ll typically set a “start” frame and an “end” frame by physically moving the gimbal to your desired positions and saving them in the app. Some gimbals allow for multiple keyframes, enabling more complex movements.
- Choose Movement Method: Depending on your gimbal, you might use a virtual joystick in the app, the physical joystick on the gimbal, or a “push-hold” mode where you manually guide the camera to each point. The gimbal will then smoothly transition between these points over the duration of your time-lapse.
Critical Camera Settings
Precise camera settings are vital for a well-exposed and visually consistent motion time-lapse.
- Interval: This determines how often your camera takes a picture. The choice depends on the speed of the action you’re capturing and your desired video length. For fast-moving clouds or cityscapes, a shorter interval (e.g., 0.5-2 seconds) is suitable. For slower phenomena like sunsets or stars, a longer interval (e.g., 5-10 seconds or more) is appropriate.
- Duration: This is the total time your camera will be capturing images. Many gimbal apps will automatically calculate the final video length based on your interval and frame rate settings.
- Shutter Speed: To achieve appealing motion blur (e.g., streaking clouds or smoothed water), adhere to the “180-degree rule.” This means setting your shutter speed to half of your interval. For example, if your interval is 2 seconds, aim for a 1-second shutter speed. This creates natural-looking motion blur. However, avoid going slower than 0.5 seconds to maintain sharpness, especially with camera movement.
- ISO and Aperture: Set your camera to manual exposure mode. Choose an aperture (f-stop) that provides adequate depth of field for your scene (f/8 to f/11 is often ideal for sharpness across the frame). Adjust your ISO to the lowest possible setting to minimize noise, especially for long exposures. Use ND filters to manage brightness if needed.
- White Balance: Set a custom white balance or choose a preset (e.g., Daylight, Cloudy) to ensure consistent color throughout your time-lapse, preventing distracting color shifts.
- Focus: Manual focus is highly recommended. Focus precisely on your main subject and then switch to manual to prevent the camera from hunting for focus during the shoot.
Gimbal Settings
Beyond the camera, your gimbal also has specific settings to optimize for motion time-lapses.
- Time-lapse Mode Activation: Ensure the dedicated time-lapse feature is activated within your gimbal’s app.
- Smooth Start/Stop: Some gimbals offer a “smooth start and stop” feature, which gradually ramps up and down the gimbal’s movement at the beginning and end of the time-lapse. This creates a more cinematic and less abrupt transition.
- Calibration: Periodically calibrate your gimbal to ensure its sensors are accurate. This helps prevent drift during long captures.
Mastering Advanced Techniques for Cinematic Motion Time-lapses
Once you’ve grasped the fundamentals, you can explore advanced techniques to add a truly cinematic feel to your motion time-lapses. These tips help you go beyond basic movement to create captivating narratives.
- Creative Movements: Don’t just stick to simple pans. Experiment with various gimbal movements:
- Orbit: Slowly circle a stationary subject.
- Push-in/Pull-out: Move towards or away from your subject to reveal details or provide context.
- Rise/Descent: Use the gimbal on an extension pole or jib down to simulate a crane shot.
- Parallax: Keep a subject centered while moving the camera laterally to create a sense of depth and dimension.
- The “Gimbal Walk” Technique: For handheld motion time-lapses, adopting a specific walking style is crucial to minimize vertical bounce and wobble. Bend your knees slightly, keep your core loose, and walk with a smooth heel-to-toe motion, almost gliding across the ground. This technique isolates the camera from your body’s natural movements, resulting in exceptionally smooth footage.
- Composition and Storytelling: Think about the narrative you want to convey.
- Leading Lines: Use natural lines in your environment to guide the viewer’s eye through the frame as the camera moves.
- Rule of Thirds: Place your subject or points of interest along the intersecting lines or points to create a balanced and dynamic composition.
- Reveal Shots: Start with an obstructed view, then use your gimbal’s motion to reveal your main subject, adding an element of surprise and engagement.
- Weather Considerations: Outdoor time-lapses are subject to the elements.
- Wind: Strong winds can cause gimbal motors to work harder, leading to vibrations or drift. Use a wind shield or position yourself to block the wind.
- Rain/Dust: Protect your camera and gimbal from moisture and dust with appropriate covers or by choosing suitable shooting locations.
Common Problems and Troubleshooting
Even with careful planning, you might encounter issues when shooting motion time-lapses. Here are common problems and their solutions:
- Gimbal Not Stabilizing or Excessive Shaking:
- Cause: Improper balancing, overloaded payload, motor issues, or incorrect settings.
- Solution: Re-balance your camera and lens precisely. Ensure your camera’s weight is within the gimbal’s payload limit. Check gimbal settings for any active sport modes or sensitivity issues. Perform a gimbal calibration via the app.
- Drifting or Unwanted Movements:
- Cause: Environmental factors (temperature changes affecting sensors), minor imbalances, or electromagnetic interference.
- Solution: Recalibrate the gimbal’s sensors on location, especially after significant temperature changes. Manually correct minor drifts using the gimbal’s joystick during the shoot. Move away from strong wireless signals or metal structures that might cause interference.
- Gimbal Not Responding to Controls:
- Cause: Bluetooth/Wi-Fi connection issues, app glitches, or joystick obstruction.
- Solution: Reset your smartphone’s Bluetooth and Wi-Fi, then re-pair the gimbal. Restart the gimbal and its companion app. Ensure the app and gimbal firmware are up to date. Clean the joystick for any debris. Reset button mappings to default if customized.
- Battery Draining Too Fast:
- Cause: Overloaded motors working harder than necessary, excessive use of power-hungry features, or old battery.
- Solution: Ensure perfect balancing to reduce motor strain. Turn off unnecessary gimbal features. Use external power banks for extended shoots.
- Incorrect Interval or Duration:
- Cause: Miscalculation or misunderstanding of time-lapse settings.
- Solution: Use a time-lapse calculator to accurately determine the interval and duration needed for your desired final video length and frame rate. Double-check all settings in the gimbal app before starting.
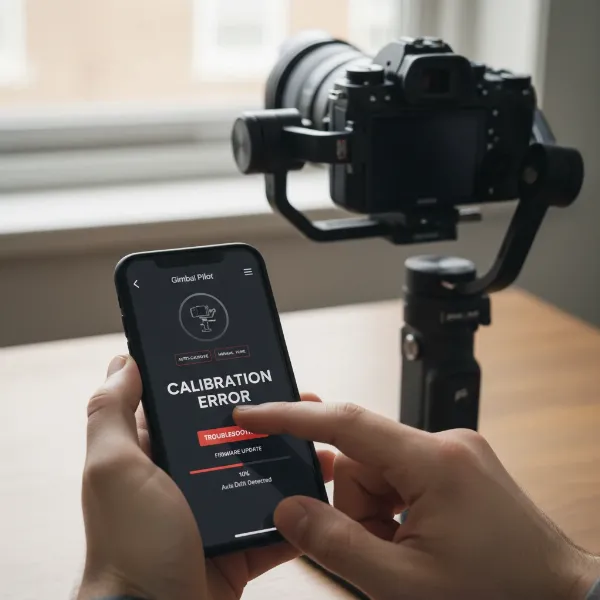 A person troubleshooting a gimbal that is shaking, checking connections and settings on a smartphone app.
Top Camera Stabilizers for Motion Time-lapse
Choosing the right gimbal can significantly impact your motion time-lapse results. Here are some highly-regarded camera stabilizers suitable for various camera types and budgets, known for their time-lapse capabilities and smooth performance.
DJI RS 4 Pro – Professional-Grade Stabilization
The DJI RS 4 Pro is an excellent choice for filmmakers working with heavy DSLR and mirrorless camera setups, supporting payloads up to 4.5kg. It boasts powerful motors, automated axis locks, and an intuitive touchscreen, making setup and operation efficient. Its advanced stabilization and long battery life (up to 12 hours, or 29 hours with the BG70 grip) are perfect for demanding motion time-lapses. While a premium option, its features ensure exceptionally smooth and controlled movements for cinematic results.
Zhiyun Crane 4 – Ergonomic and Robust
For professionals seeking a comfortable yet powerful gimbal, the Zhiyun Crane 4 stands out. It supports up to 4kg payloads and features an adjustable sling grip and wrist rest that reduce fatigue during long shoots. Its precise pan, tilt, and roll action, combined with motor warning lights for easy balancing, make it a reliable tool for intricate motion time-lapses. The built-in fill light and Bluetooth shutter control add to its versatility.
DJI RS 4 Mini – Lightweight and Portable
If portability is a priority, the DJI RS 4 Mini is a compact yet capable option. Weighing only 850g, it supports payloads up to 2kg, making it suitable for many mirrorless cameras and even smartphones. It inherits professional-grade stabilization and auto-locking axes from its larger siblings, offering surprising performance in a small package. It’s ideal for vloggers and solo creators who need a travel-friendly stabilizer for dynamic time-lapses.
DJI Osmo Mobile Series / Zhiyun Smooth Series – Smartphone Powerhouses
For smartphone users, gimbals like the DJI Osmo Mobile 7P or Zhiyun Smooth 5 Combo transform your phone into a powerful motion time-lapse tool. These gimbals offer excellent stabilization, dedicated time-lapse modes, and intelligent tracking features. They are highly portable, user-friendly, and integrate seamlessly with their respective apps to set motion paths, intervals, and durations, making them perfect for on-the-go creativity.
DJI Osmo Pocket 3 – All-in-One Solution
The DJI Osmo Pocket 3 is a unique, integrated camera and gimbal system perfect for vloggers and casual creators. It records in 4K, supports motion time-lapse natively, and is incredibly compact. If you prefer a device that handles both the camera and stabilization, simplifying your setup, the Osmo Pocket 3 offers impressive quality and ease of use for dynamic time-lapses.
Post-Production Essentials
Once you’ve captured your motion time-lapse photos, the magic truly happens in post-production. This is where you assemble your images into a fluid video, fine-tune the visuals, and apply any necessary stabilization.
- Organize and Import: Start by importing all your captured photos into a dedicated folder on your computer. Use software like Adobe Lightroom or Adobe Camera Raw to batch-grade your RAW photos, ensuring consistent exposure and color across the entire sequence.
- Assemble into Video: Most modern video editing software (e.g., Adobe Premiere Pro, DaVinci Resolve, Adobe After Effects) allows you to import image sequences directly as video files. Specify the desired frame rate (e.g., 24, 25, or 30 frames per second) during import to control the speed of your time-lapse.
- Stabilization (if needed): Even with a gimbal, minor jitters or drift can sometimes occur, especially with hyperlapses. Use the built-in stabilization features in your editing software, such as Adobe’s Warp Stabilizer in After Effects. Start with default settings, then adjust parameters like smoothing or stabilization type if necessary, making sure to avoid excessive distortion at the edges of the frame.
- Color Grading and Effects: Enhance the mood and aesthetic of your time-lapse with color grading. Adjust contrast, saturation, and overall color balance. You can also add subtle effects like cinematic letterboxing or light leaks.
- Export: Render your final motion time-lapse in a high-quality format and resolution (e.g., 4K, 1080p) suitable for your intended platform. Consider archiving a master file in a lossless codec for future use.
Buying Guide: Lời khuyên từ chuyên gia
Investing in a Camera Stabilizer for motion time-lapses can significantly enhance your video production. To make the best choice, consider these expert tips.
- Define Your Needs and Purpose: Are you shooting professional films, travel vlogs, or just experimenting with your smartphone? Your primary use case will guide your choice of camera compatibility, payload capacity, and required features. A heavy-duty gimbal is overkill for a smartphone, just as a phone gimbal won’t cut it for a cinema camera.
- Evaluate Your Budget: Gimbals range from under $100 for basic smartphone stabilizers to over $800 for professional camera systems. Determine how much you’re willing to invest and look for the best value within that price range, prioritizing features that are essential for your work.
- Read Reviews and Compare Products: Before purchasing, thoroughly research different models. Pay attention to user reviews regarding ease of balancing, battery life, app functionality, and time-lapse specific features. Compare specifications like payload, weight, and operational modes across several brands.
- Consider Future-Proofing: If you plan to upgrade your camera in the future, choose a gimbal that can accommodate a slightly heavier payload than your current setup. This foresight can save you from needing to buy a new gimbal sooner than expected.
- Understand Warranty and Support: Check the manufacturer’s warranty, return policy, and customer support. Reliable after-sales service can be invaluable if you encounter technical issues or need assistance with your gimbal.
“A well-executed motion time-lapse elevates a simple scene into a dynamic story. The key is to blend technical precision with creative vision, letting the camera move in a way that complements the passage of time.”
Conclusion
Creating stunning motion time-lapses with your gimbal is an incredibly rewarding journey that combines technical skill with artistic vision. By understanding the fundamentals of balancing, mastering precise camera and gimbal settings, and employing creative movements, you can capture dynamic sequences that captivate your audience. Remember to consider your gear carefully, experiment with different techniques, and don’t shy away from troubleshooting common issues to refine your craft. The world of stabilized motion time-lapses offers endless possibilities for unique storytelling.
What incredible transformations will you capture with your gimbal and motion time-lapse skills?
Frequently Asked Questions
What is the difference between a time-lapse, motion time-lapse, and hyperlapse?
A standard time-lapse captures a series of still images from a fixed camera position. A motion time-lapse adds dynamic camera movement (pan, tilt, or dolly) during the capture, typically from a stationary base. A hyperlapse, often confused with motion time-lapse, involves the camera physically moving over a longer distance between each shot, creating an even more dramatic sense of travel through space.
How do I calculate the interval for my motion time-lapse?
The ideal interval depends on the speed of the action you’re recording. For fast-moving events like traffic or busy crowds, a shorter interval (e.g., 0.5-2 seconds) is suitable. For slower changes such as clouds or sunsets, a longer interval (e.g., 5-10 seconds) works best. Use a time-lapse calculator to determine the exact interval needed for your desired final video duration and frame rate.
Can I create a motion time-lapse with a smartphone gimbal?
Yes, absolutely! Modern smartphone gimbals are highly capable and often include dedicated motion time-lapse modes within their companion apps. They allow you to set start and end points for movement, define intervals, and capture professional-looking motion time-lapses directly with your phone. They are an accessible entry point for learning this technique.
What are ND filters, and why are they important for time-lapse?
ND (Neutral Density) filters are pieces of darkened glass that reduce the amount of light entering your camera lens without affecting color. They are crucial for time-lapse photography, especially in bright conditions, because they allow you to use longer shutter speeds to create appealing motion blur (e.g., silky water or streaking clouds) without overexposing your images.