Have you ever captured what you thought was the perfect shot, only to review the footage later and find it riddled with subtle wobbles or a stubbornly tilted horizon? Even with the best camera stabilizer, achieving truly cinematic smoothness isn’t always automatic. This is where gimbal calibration comes in – a crucial, yet often misunderstood, step to unlock your stabilizer’s full potential. It’s the secret handshake between your camera and the gimbal’s sophisticated motors, ensuring every movement is fluid and professional. This guide will walk you through everything you need to know about properly calibrating your camera gimbal, from understanding its importance to executing the process flawlessly.
What is Gimbal Calibration and Why is it Essential?
At its core, a gimbal is a device that uses motors and sensors to keep your camera stable, counteracting unwanted movements across multiple axes. While balancing a gimbal involves physically adjusting your camera on the rig to find its center of gravity – a mechanical process that ensures the camera sits level and places minimal strain on the motors – calibration is an electronic fine-tuning. It’s a software-driven procedure where the gimbal’s internal sensors and motors are re-aligned to their factory specifications.
Why is this distinction important, and why is calibration so essential? Over time, even high-quality gimbals can experience slight mechanical drift or sensor misalignment due to usage, environmental factors, or even minor bumps. An uncalibrated gimbal might struggle with:
- Unlevel Horizons: The most common sign, where your footage consistently tilts to one side.
- Jittery or Jerky Movements: Instead of smooth glides, you might see subtle vibrations or abrupt corrections.
- Reduced Battery Life: Motors work harder to compensate for misalignments, draining power faster.
- Inaccurate Motor Response: The gimbal might not react precisely to your inputs, leading to less predictable shots.
Proper calibration ensures that the motors and sensors are perfectly synchronized, allowing the gimbal to operate at peak efficiency. It’s the final, crucial step after balancing to guarantee seamless stability and truly professional-looking footage.
When to Calibrate Your Gimbal: Recognizing the Signs
Knowing when to calibrate is just as important as knowing how. While there’s no strict “every day” rule, several indicators suggest it’s time for a calibration session:
- Noticeable Unlevel or Shaky Footage: This is the most direct signal. If your gimbal isn’t holding the horizon perfectly or exhibits unusual jitters, calibration is likely needed.
- After a Firmware Update: Manufacturers often recommend recalibrating after updating your gimbal’s firmware, as software changes can affect sensor interpretation.
- Gimbal App Prompts: Many modern gimbals come with companion apps that will explicitly notify you if calibration is required.
- Gimbal Appears Skewed on Power-Up: If the camera or gimbal arms visibly lean or are misaligned right after turning the device on, it’s a clear sign.
- Significant Changes in Your Camera Setup: While balancing is key here, adding a new, heavier lens, a monitor, or other accessories might subtly shift the gimbal’s ideal operating parameters, making recalibration a good practice after re-balancing.
- Roughly Monthly or After Heavy Use: As a general maintenance guideline, performing a calibration once a month or after particularly demanding shoots can help maintain optimal performance.
- After a Minor Impact or Drop: Even if there’s no visible damage, a sharp jolt can affect the internal sensors, necessitating a recalibration.
Think of it like tuning a musical instrument; you don’t do it constantly, but you do it when it sounds off or after significant changes to ensure peak performance.
Preparing Your Gimbal for Calibration
Before you dive into the calibration process, a few preparatory steps will ensure accuracy and efficiency:
Ensure Your Camera is Perfectly Balanced
This is paramount. Calibration can only fine-tune what’s already physically stable. Take the time to balance your camera on each axis (tilt, roll, pan) until it holds its position freely when the motors are off. An imbalanced gimbal forces the motors to work harder, leading to poor performance and faster battery drain, regardless of calibration.
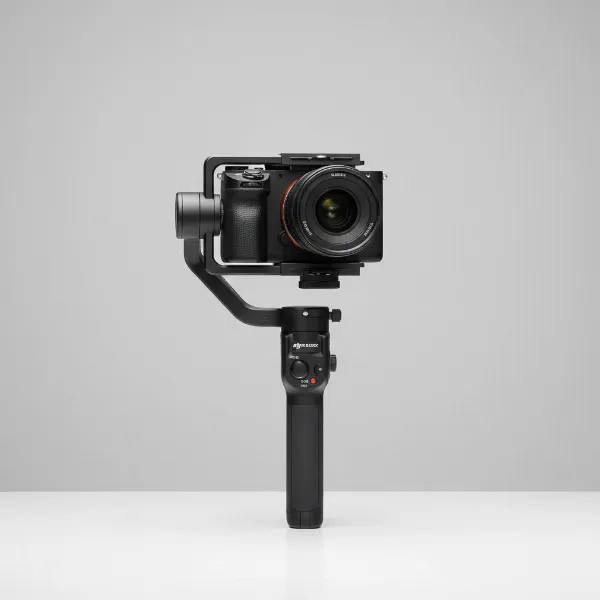 A camera mounted on a handheld gimbal, perfectly balanced and level on all axes.
Fully Charge Your Gimbal’s Battery
Calibration consumes power. A low battery can lead to an incomplete or inaccurate calibration process. Always start with a fully charged gimbal.
Place the Gimbal on a Flat, Stable Surface
For the calibration process to be accurate, the gimbal must be absolutely still and on a perfectly level surface. A wobbly table or an uneven floor will lead to incorrect sensor readings. Many manufacturers specifically instruct users to place the gimbal on a flat surface and not touch it during calibration.
Update Firmware
Ensure your gimbal’s firmware is up to date. Manufacturers frequently release updates that improve stability, add features, and refine calibration algorithms.
Step-by-Step Guide: How to Properly Calibrate Your Gimbal
While specific steps may vary slightly between manufacturers (DJI, Zhiyun, FeiyuTech, etc.), the general process for calibrating your gimbal remains consistent. Most modern gimbals offer an “auto-calibration” feature accessible either through a dedicated smartphone app or directly via the gimbal’s onboard menu.
General Steps for Handheld Gimbals (e.g., DJI Osmo Mobile, Ronin Series)
- Mount and Balance Your Camera/Phone: Securely attach your camera or smartphone to the gimbal and perform a thorough manual balance across all axes. This is non-negotiable.
- Power On and Connect: Turn on your gimbal. If using a smartphone gimbal, ensure your phone is attached and connected via Bluetooth to the gimbal’s companion app. For larger camera gimbals, power on both the gimbal and your camera.
- Access Calibration Settings:
- Via App: Open the gimbal’s companion app on your smartphone. Navigate to the “Gimbal Settings” or “System Settings” menu. Look for an option labeled “Gimbal Auto Calibration,” “Motor Calibration,” or simply “Calibration.”
- Via Onboard Menu: Some gimbals have a built-in screen and menu system. Use the joystick or buttons to navigate to the calibration option.
- Initiate Calibration: Select “Start” or “Calibrate.” The app or gimbal will typically prompt you to place the gimbal on a flat, level surface.
- Do Not Touch: This is critical. Once the calibration process begins, do not touch, move, or bump the gimbal until it’s complete. The gimbal will typically move and rotate its axes to gather sensor data. This process usually takes a minute or two.
- Confirmation: You’ll receive a confirmation message in the app or on the gimbal’s screen when calibration is successfully completed.
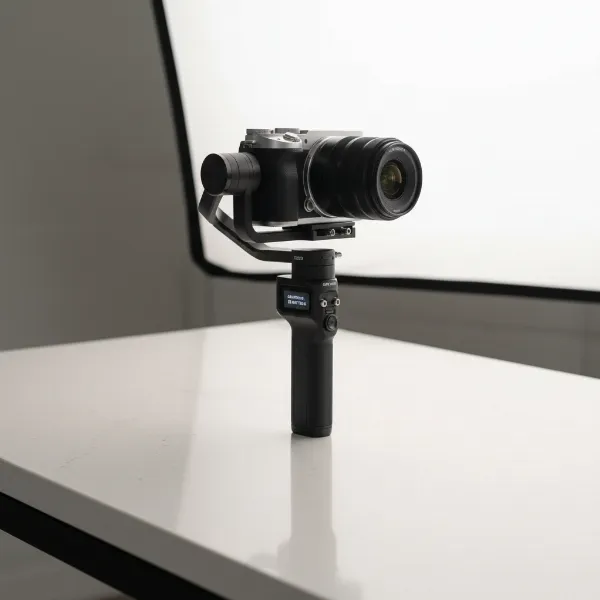 A handheld gimbal with a camera, placed on a flat surface undergoing automatic calibration.
Steps for Drone Gimbals (e.g., DJI Mavic Series)
Drone gimbals, while integrated, also require calibration, particularly if you notice issues or after firmware updates.
- Power On and Connect: Power on your drone and remote controller, ensuring they are connected and the control app (e.g., DJI Pilot, DJI Fly) is running.
- Navigate to Gimbal Settings: Open the camera view in the app, then access the “Gimbal Settings” or “Camera Settings” menu.
- Start Calibration: Select “Gimbal Calibration.” The app will instruct you to place the drone on a flat, level surface.
- Automated Process: The gimbal will automatically rotate and adjust its motors and sensors. Again, ensure the drone remains still and untouched during this time.
- Confirmation and Test: A confirmation message will appear. It’s advisable to perform a short test flight to ensure smooth camera movements.
Troubleshooting Common Gimbal Calibration Issues
Even with careful preparation, you might encounter issues during or after calibration. Here are common problems and their solutions:
- Calibration Fails Repeatedly:
- Check Level Surface: The most common culprit. Ensure your surface is absolutely flat and stable.
- Physical Obstructions: Look for anything that might be impeding the gimbal’s movement (e.g., a camera strap, loose cable).
- Battery Level: A low battery can cause failures. Ensure it’s fully charged.
- Firmware: An outdated firmware can sometimes cause calibration issues. Update to the latest version.
- Gimbal Still Appears Unlevel or Shaky After Calibration:
- Re-balance: Calibration can’t fix fundamental balancing issues. Revisit your manual balancing process carefully.
- Motor Strength/Payload Settings: Some advanced gimbals allow you to adjust motor strength based on your camera’s weight. Ensure these settings are appropriate for your payload.
- Environmental Factors: Strong winds or extreme temperatures can affect gimbal performance.
- Gimbal Calibration Option is Missing:
- This is rare, but double-check your app or gimbal menu. Sometimes it’s nested under “System Settings” or “Control.”
- Ensure your device is properly connected and recognized by the app.
Expert Tips for Optimal Gimbal Performance
Beyond just calibration, a few expert insights can help you maximize your gimbal’s performance and longevity:
- Balance First, Always: “Think of balancing as the foundation and calibration as the fine paint job,” says the Admin of StabilizerPro.com. “You can’t have a perfect finish without a solid base.” Always prioritize precise physical balancing before any electronic calibration.
- Understand Your Gimbal’s Modes: Familiarize yourself with different follow modes (pan-follow, tilt-follow, FPV) and how they affect camera movement. Sometimes a perceived “issue” is simply the gimbal operating in a different mode than intended.
- Practice Your Movement: A gimbal stabilizes, but it doesn’t make you a smooth operator automatically. Practice “ninja walking” or “gorilla walking” techniques to minimize body movement and get the most out of your stabilizer.
- Gentle Handling: While gimbals are built for action, avoid unnecessary bumps or rough handling that can gradually affect internal sensors. When transporting, lock the axes if your gimbal has that feature.
- Regular Cleaning: Keep the motor arms and mounting plates free of dust and debris that could interfere with smooth movement or precise balancing.
Gimbal Maintenance: A Professional’s Perspective
From years of hands-on experience, I can tell you that proper maintenance is the cornerstone of reliable performance. It’s not just about fixing problems when they arise, but preventing them. Regularly checking all screws and connections, keeping contact points clean, and storing your gimbal in its protective case are small habits that yield significant returns in consistent, smooth footage. Don’t underestimate the power of these routine checks in prolonging your gear’s lifespan and ensuring it’s always ready for your next shoot.
Conclusion
Gimbal calibration is an indispensable aspect of maintaining your Camera Stabilizer and ensuring consistently smooth, professional-grade footage. By understanding what calibration is, when to perform it, and following the proper steps, you can eliminate frustrating wobbles and achieve the cinematic quality you desire. Remember to always start with a well-balanced camera, work on a level surface, and let the gimbal do its work undisturbed. With these practices, you’ll transform shaky shots into effortlessly stable visuals. What’s your biggest challenge when aiming for perfectly smooth camera movements?
Frequently Asked Questions
How often should I calibrate my gimbal?
It is generally recommended to calibrate your gimbal whenever you notice issues like unlevel horizons or shaky footage, after firmware updates, or after a significant bump. A good proactive practice is to calibrate approximately once a month to maintain optimal performance.
Is gimbal balancing the same as calibration?
No, balancing and calibration are distinct processes. Balancing is the physical adjustment of your camera on the gimbal to find its center of gravity, while calibration is an electronic software process that fine-tunes the gimbal’s motors and sensors after balancing to ensure they are accurately aligned.
What should I do if my gimbal calibration fails?
If calibration fails, first ensure the gimbal is placed on a completely flat and stable surface and that nothing is obstructing its movement. Also, check that your gimbal’s battery is fully charged and its firmware is up to date. Re-attempting the calibration after these checks often resolves the issue.