The dolly zoom, an effect that warps perspective and plays tricks on the viewer’s mind, is a powerful cinematic tool. Made famous by Alfred Hitchcock’s “Vertigo,” this visually arresting technique can instantly elevate your footage from amateur to professional, creating a sense of unease, revelation, or dramatic emphasis. While it might appear complex, achieving this mind-bending effect is entirely within reach for filmmakers and videographers using a camera gimbal. This comprehensive guide will walk you through the theory, equipment, and practical steps to master the dolly zoom, ensuring your gimbal shots captivate your audience.
What is the Dolly Zoom Effect and Why Use It?
The dolly zoom, also known as the Vertigo effect, the Hitchcock shot, the Jaws effect, or a Zolly shot, is an in-camera optical illusion that appears to undermine normal visual perception. It’s achieved by simultaneously dollying (moving the camera) either forwards or backward, while zooming the lens in the opposite direction. The crucial element is to keep your subject the same size in the frame throughout the shot. This combination causes the background to either dramatically zoom in or out, while the foreground subject maintains its scale, creating a disorienting, unsettling, or even dreamlike sensation.
Filmmakers utilize the dolly zoom for a multitude of narrative purposes. It can visually represent a character’s sudden realization, psychological distress, or a dramatic shift in emotion. It’s also an excellent way to emphasize a subject, isolating them from a background that seems to pull away or engulf them. Beyond its psychological impact, the effect simply looks incredibly professional and adds a unique cinematic flair to any project, transforming ordinary scenes into memorable moments.
Essential Gear for a Perfect Gimbal Dolly Zoom
To successfully execute a dolly zoom with a gimbal, having the right equipment is paramount. While the core technique relies on coordinated movement and zoom, specific gear can significantly simplify the process and enhance the quality of your final shot.
Camera and Lens Setup
|
Our Picks for the Best Camera Stabilizer in 2026
As an Amazon Associate I earn from qualifying purchases.
|
||
| Num | Product | Action |
|---|---|---|
| 1 | FeiyuTech SCORP 3 Gimbal Stabilizer for Camera, Built-in AI Tracking Sensor & Detachable Remote Control, 3.5KG Payload Camera Stabilizer with Touch Screen, Vertical Shooting |

|
| 2 | Zeadio Camera Stabilizer Kit, All-in-One Handheld Stabilizer with LED Video Light, Microphone, Phone Holder & Action Camera adaper, Fits for All Camera, DSLR, Action Camera and All Smartphones |
|
| 3 | DJI RS 3 Mini, 3-Axis Gimbal Stabilizer for Cameras Canon/Sony/Panasonic/Nikon/Fujifilm, 2 kg (4.4 lbs) Tested Payload, Camera Gimbal with Native Vertical Shooting, Black |
|
| 4 | ZHIYUN CINEPEER Weebill 3E [Official], 3-Axis Lightweight Gimbal Stabilizer for DSLR & Mirrorless Camera Canon/Sony/Panasonic/Nikon, 3KG Payload, Native Vertical Shooting, Bluetooth Shutter Control |
|
| 5 | DJI Osmo Mobile 7 Gimbal Stabilizer for iPhone, Android, Built-in Tripod, Portable Stabilizer for iPhone, Selfie Stick, 3-Axis Phone Gimbal, ActiveTrack 7.0, One-Tap Edit, 10hrs Use, Phone Charging |
|
| 6 | Zeadio Video Action Stabilizing Handle Grip Handheld Stabilizer with Cold-Shoe Mount for All DSLR Camera Camcorder |
|
| 7 | 3-Shoe DSLR/Mirrorless/Action Camera Camcorder Phone Stabilizer Expansion Cage Mount Moviemaking Holder Rig YouTube Tiktok Vlogging Video Kit Compatible with GoPro Canon Nikon Sony iPhone Android |
|
| 8 | DJI Osmo Mobile 8 Advanced Tracking Combo Gimbal Stabilizer for Phone, AI Native Tracking with Audio & Lighting, 360° Pan Rotation, Built-in Extension Rod & Tripod, 10h Battery, Extension Rod |
|
| 9 | DJI Osmo Mobile 7P Gimbal Stabilizer for iPhone, Android, Native Tracking, Lighting, 3-Axis Phone Gimbal, Quick Launch, One-Tap Edit, Built-in Extension Rod & Tripod, 10hrs Use, Phone Charging |
|
| 10 | FeiyuTech SCORP 2 Gimbal Stabilizer for DSLR and Mirrorless Camera, Integrated Al Tracking Sensor, 3-Axis Camera Stabilizer for Sony Canon Panasonic Nikon, 2.5kg Payload Touch Screen Vertical Shooting |
|
The choice of camera and lens directly impacts your ability to perform a dolly zoom. An optical zoom lens is highly recommended, as it allows for true perspective changes without compromising image quality, unlike digital zoom. For mirrorless or DSLR cameras, a lens with a good zoom range (e.g., 24-70mm or 70-200mm) is ideal. Many modern lenses feature electronic zoom control, which can be easier to operate smoothly while moving. If you’re using a smartphone, ensure it has either optical zoom capabilities or a high-quality digital zoom that won’t degrade your footage too much when manipulated. Some smartphone camera apps also offer specific zoom controls that can be synced with movement.
Choosing the Right Gimbal
A 3-axis camera gimbal is indispensable for a smooth dolly zoom, as it eliminates unwanted shakes and jitters that would ruin the effect. The gimbal ensures your camera maintains a steady horizon and precise framing of your subject as you move. Many contemporary gimbals, particularly from brands like DJI (e.g., DJI RS series, DJI OM series for smartphones) and Hohem, come equipped with built-in “Dolly Zoom” or “Dyna-Zoom” modes. These intelligent features automate the zoom and often guide your movement, making the effect far easier to achieve. For gimbals paired with manual zoom lenses, a focus motor (or zoom motor) attached to the lens is crucial. This allows you to control the zoom electronically via a gimbal wheel or app, rather than physically twisting the lens barrel, which would introduce instability.
Accessories (Optional but Recommended)
While not strictly essential, certain accessories can further refine your dolly zoom. An external monitor mounted to your gimbal setup provides a larger, clearer view of your shot, making it easier to monitor your subject’s size and framing during the complex maneuver. For the absolute smoothest camera movement, especially over longer distances, consider using a small dolly or sliders. While a gimbal provides stabilization for handheld movement, a physical track or platform ensures a perfectly linear path, removing any lateral drift or subtle wobbles that even the most skilled gimbal operator might produce.
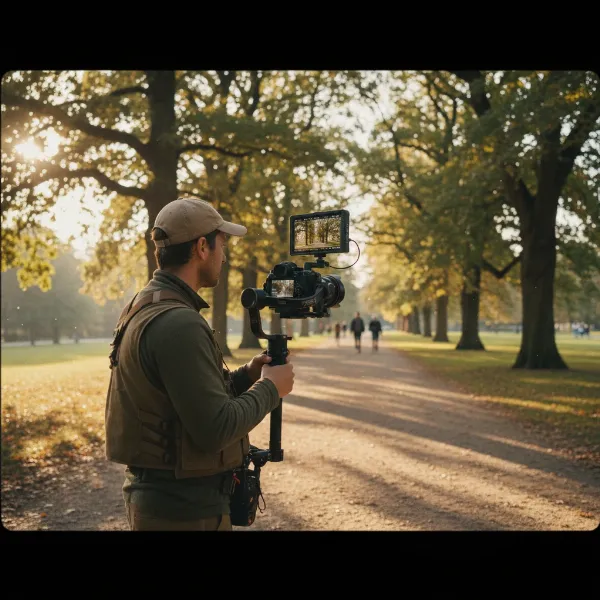 A filmmaker with a mirrorless camera mounted on a 3-axis gimbal, with a zoom lens, preparing to shoot a dolly zoom effect in a park setting.
Step-by-Step Guide: Achieving the Dolly Zoom with Your Gimbal
Executing a dolly zoom requires precision and coordination. Whether you’re opting for a manual approach or leveraging your gimbal’s smart features, understanding the fundamental steps is key to success.
Understanding the Core Principle
At its heart, the dolly zoom is a balancing act: you move the camera towards or away from your subject, while simultaneously zooming the lens in the opposite direction. If you’re moving the camera towards the subject (dollying in), you must zoom out with the lens. Conversely, if you’re moving the camera away from the subject (dollying out), you must zoom in. The critical objective is to maintain your subject at a consistent size within the frame throughout the entire shot. This inverse relationship between camera movement and lens zoom is what creates the captivating background distortion.
Setup and Calibration
Before you even think about hitting record, ensure your equipment is meticulously prepared. First, balance your gimbal perfectly with your camera and lens attached. An unbalanced gimbal will struggle to stabilize, leading to shaky footage and making the dolly zoom impossible to achieve smoothly. If your setup includes a focus or zoom motor, install it and calibrate it according to your gimbal’s instructions. This ensures accurate and responsive zoom control. Finally, if your gimbal has a dedicated “Dolly Zoom” function (e.g., via a companion app), activate and configure it. These smart modes often simplify the process by providing on-screen guides or even automating parts of the movement and zoom.
Framing Your Shot
The success of your dolly zoom heavily depends on your chosen subject and background. Select a distinct subject that stands out against its surroundings. The effect is most pronounced when there’s a good amount of visual separation and depth between your subject and the background. Avoid shooting against a plain wall, as the effect will be significantly diminished. Decide on your initial framing: do you want to start wide and zoom in, or start tight and zoom out? Once framed, mentally or physically mark your start and end points for both camera position and zoom level. This pre-visualization helps you maintain consistency during the actual shot.
The Execution: Manual vs. Automated
The actual execution of the dolly zoom can be approached in two primary ways, depending on your gear and preference.
Manual Technique
For those without automated gimbal features, or who prefer full creative control, the manual technique demands practice and finesse.
- “Ninja Walking”: To ensure your camera movement is as smooth as possible, adopt a “ninja walk.” Bend your knees, keep your core engaged, and move with a deliberate, gliding motion. Avoid sudden jerks or changes in pace. Keep your elbows slightly bent and your grip on the gimbal firm but relaxed to absorb micro-vibrations.
- Synchronized Movement and Zoom: This is the most challenging part. As you smoothly walk towards or away from your subject, simultaneously operate your lens’s zoom control in the opposite direction. The key is to keep your subject’s size constant in the frame. This requires a high degree of coordination and often benefits from multiple takes. Start slow and deliberate, focusing on maintaining the subject’s scale.
- Practice: There’s no substitute for practice. Experiment with different speeds, distances, and zoom ranges until the movements become second nature.
Automated Technique (Gimbal Specific)
Many modern gimbals offer intelligent features that simplify the dolly zoom.
- Utilize Gimbal Apps: Gimbals like the DJI OM series (with DJI Mimo) or Hohem gimbals (with Hohem Joy App) feature dedicated “Dyna-Zoom” or “Dolly Zoom” modes.
- Set A/B Points: Typically, you’ll set a starting point (A) for your camera’s position and zoom, and an ending point (B). The app or gimbal guides you through the process, often automating the zoom while prompting you to move the camera smoothly.
- Set Duration: You can often specify the duration of the effect, which helps the gimbal synchronize the zoom speed with your movement.
- Follow Instructions: Simply follow the on-screen prompts, moving your gimbal smoothly as the camera automatically zooms, keeping your subject centered.
Advanced Tips for a Flawless Dolly Zoom
Even after mastering the basic technique, several advanced considerations can elevate your dolly zoom from good to truly flawless. These tips focus on fine-tuning your shot and troubleshooting common issues.
Subject and Background Selection
The visual impact of the dolly zoom is directly proportional to the contrast and depth between your subject and its background. Always emphasize strong separation by positioning your subject a good distance in front of a busy or textured background. This allows the background to noticeably distort. Consider locations with leading lines, architectural elements, or natural landscapes that can exaggerate the effect. Optimal lighting conditions also play a role; clear, even lighting on both your subject and background can help highlight the perspective shift without distracting shadows or overexposed areas.
Maintaining Smoothness and Consistency
The magic of the dolly zoom lies in its seamless execution. Strive for consistent speed in both your camera movement and lens zoom. Any sudden acceleration or deceleration will break the illusion. Practice your “ninja walk” to achieve a steady, gliding motion. Pay attention to your breathing; holding your breath or breathing erratically can introduce subtle wobbles. Take a deep breath before you start, exhale slowly, and move with controlled fluidity. Remember, continuous practice is the most effective way to engrain the muscle memory required for perfect synchronization.
Post-Production Enhancements (if necessary)
While the goal is always to get the shot right in-camera, post-production can sometimes be used for minor refinements. If your timing was slightly off, you can use speed ramping to subtly adjust the movement or zoom speed in your editing software. For slight camera shakes that the gimbal couldn’t entirely eliminate, digital stabilization can be applied cautiously. For those who can’t achieve the effect in-camera, it’s also possible to “fake” the dolly zoom in editing by keyframing scale and position, but this often looks less convincing than a true in-camera effect due to the lack of genuine optical distortion.
Common Pitfalls and How to Avoid Them
The dolly zoom is a visually stunning effect, but it’s also one that can easily go wrong if not executed with care. Being aware of common pitfalls can save you time and frustration.
A frequent mistake is uneven movement or zoom. If you move too fast or zoom too quickly at different points, the effect will appear jarring and unprofessional. Practice maintaining a consistent, fluid motion and a steady zoom speed. Another major issue is the subject drifting out of frame or changing size. This immediately ruins the illusion. Constant vigilance on your external monitor or camera screen is vital to ensure your subject remains perfectly centered and its perceived size is unchanging.
Lack of background separation is another common pitfall. If your subject is too close to a plain background, the dramatic perspective shift won’t be noticeable, rendering the effort pointless. Always choose a shooting environment with a distinct foreground, subject, and background. Finally, underestimating the need for practice is a sure way to fail. The dolly zoom is a complex maneuver that requires muscle memory and precise coordination. Dedicate time to practice your technique before attempting it on an important shoot.
“The dolly zoom isn’t just a technical trick; it’s a storytelling device. Focus on the emotion or narrative you want to convey, and let that guide your execution. Technical proficiency will follow with diligent practice.” – Admin, StabilizerPro.com Technical Expert
Conclusion
The dolly zoom is a captivating cinematic technique that, when mastered, can add a layer of professional polish and dramatic impact to your videos. By understanding the core principle of simultaneous, inverse movement and zoom, and leveraging the stability of your camera gimbal, you can achieve this iconic “Vertigo effect” with stunning results. From carefully selecting your gear to meticulously practicing your execution, every step contributes to the seamless illusion that will leave your audience spellbound.
Remember that patience and persistence are your greatest allies. Will you embrace the challenge and unlock the full potential of your camera gimbal to create truly unforgettable cinematic moments?
Frequently Asked Questions
Is a zoom lens required for a dolly zoom?
While an optical zoom lens is ideal for the most authentic and high-quality dolly zoom effect, it’s not strictly mandatory. You can achieve a similar effect with prime lenses by combining camera movement with digital zooming in post-production, though this may result in a loss of resolution or a less convincing optical distortion compared to an in-camera optical zoom.
Can I do a dolly zoom with a smartphone gimbal?
Yes, absolutely! Many modern smartphone gimbals, particularly those from DJI (like the Osmo Mobile series) and Hohem, offer dedicated “Dolly Zoom” or “Dyna-Zoom” features within their companion apps. These features automate the digital zoom while guiding you to move your phone smoothly, making the effect surprisingly accessible for mobile filmmakers.
What’s the difference between dolly zoom and regular zoom?
A regular zoom changes the focal length of the lens, making the subject and background appear closer or farther away proportionally, without changing the camera’s physical position. A dolly zoom, however, involves simultaneously changing both the camera’s physical distance to the subject and the lens’s focal length in opposite directions, keeping the subject’s size constant while dramatically distorting the background’s perspective.
How important is a steady hand?
A steady hand, or more accurately, a steady overall movement, is critically important for a successful dolly zoom. Any shakes, jolts, or uneven motion will break the illusion and make the effect appear unprofessional. This is precisely why a gimbal is so crucial, as it provides the necessary stabilization, allowing you to focus on the synchronized movement and zoom without worrying about handheld camera shake.