Capturing breathtakingly smooth video is the dream of every videographer, but achieving that buttery stability becomes a significant challenge when you introduce long, heavy lenses to your camera stabilizer. An unbalanced setup can quickly turn your cinematic aspirations into a shaky nightmare, straining your equipment, draining batteries, and producing footage riddled with vibrations. This guide will walk you through the essential steps and expert tips to perfectly balance your long lenses on a gimbal, ensuring you capture that flawless, professional-grade footage you’ve always envisioned. Let’s unlock the full potential of your camera and stabilizer together.
What is a Camera Stabilizer and Why You Need One
A camera stabilizer is a device designed to keep your camera steady and your footage smooth, even when you’re moving. In the world of videography, gimbals are a popular type of stabilizer, using motorized axes to counteract unwanted movements and vibrations. They are indispensable tools for creating dynamic, cinematic shots, allowing you to walk, run, or even shoot from moving vehicles without introducing distracting shakes. The primary benefit of using a gimbal is to achieve incredibly fluid, professional-looking video, reducing the jarring effects of handheld shooting and opening up a world of creative possibilities.
Understanding the Challenges of Balancing Long Lenses on Gimbals
Integrating long or heavy lenses with your gimbal presents unique challenges that can frustrate even experienced users. These substantial optics inherently shift the camera’s center of gravity far forward, creating an uneven weight distribution that the gimbal’s motors must constantly fight against. This continuous struggle leads to several critical issues:
The motors are forced to work harder, which rapidly drains battery life and can cause the gimbal to overheat. An imbalanced setup also increases the likelihood of vibrations, subtle jitters, or unexpected camera drifts in your footage, undermining the very purpose of using a stabilizer. Without proper balance, your gimbal cannot operate at its peak, compromising the smoothness and overall quality of your video.
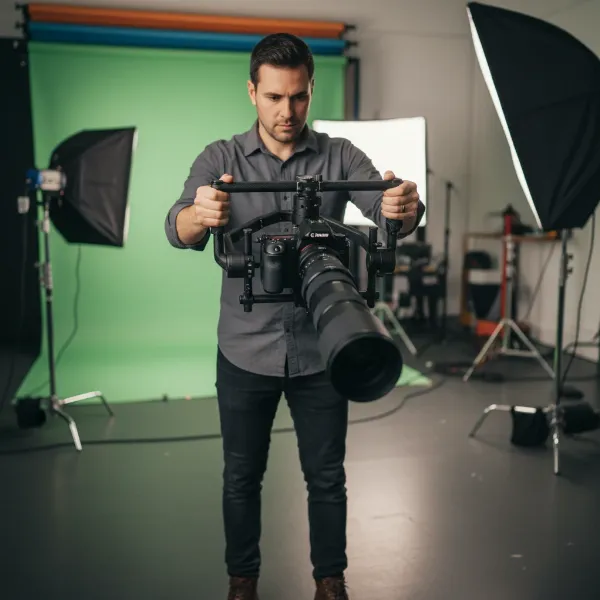 A videographer meticulously balancing a camera with a long telephoto lens on a professional 3-axis gimbal, with clear focus on the adjustment points and the lens's extension.
Step-by-Step Guide: How to Balance Long Lenses on a Gimbal Setup
Achieving perfect balance is a meticulous process, but following these steps will ensure your long lens setup is stable and ready for action.
Pre-Balancing Preparations
|
Our Picks for the Best Camera Stabilizer in 2026
As an Amazon Associate I earn from qualifying purchases.
|
||
| Num | Product | Action |
|---|---|---|
| 1 | FeiyuTech SCORP 2 Gimbal Stabilizer for DSLR and Mirrorless Camera, Integrated Al Tracking Sensor, 3-Axis Camera Stabilizer for Sony Canon Panasonic Nikon, 2.5kg Payload Touch Screen Vertical Shooting |

|
| 2 | ZHIYUN CINEPEER Weebill 3E [Official], 3-Axis Lightweight Gimbal Stabilizer for DSLR & Mirrorless Camera Canon/Sony/Panasonic/Nikon, 3KG Payload, Native Vertical Shooting, Bluetooth Shutter Control |
|
| 3 | Zeadio Video Action Stabilizing Handle Grip Handheld Stabilizer with Cold-Shoe Mount for All DSLR Camera Camcorder |
|
| 4 | 3-Shoe DSLR/Mirrorless/Action Camera Camcorder Phone Stabilizer Expansion Cage Mount Moviemaking Holder Rig YouTube Tiktok Vlogging Video Kit Compatible with GoPro Canon Nikon Sony iPhone Android |
|
| 5 | DJI Osmo Mobile 7 Gimbal Stabilizer for iPhone, Android, Built-in Tripod, Portable Stabilizer for iPhone, Selfie Stick, 3-Axis Phone Gimbal, ActiveTrack 7.0, One-Tap Edit, 10hrs Use, Phone Charging |
|
| 6 | Zeadio Camera Stabilizer Kit, All-in-One Handheld Stabilizer with LED Video Light, Microphone, Phone Holder & Action Camera adaper, Fits for All Camera, DSLR, Action Camera and All Smartphones |
|
| 7 |
|
|
| 8 | DJI RS 3 Mini, 3-Axis Gimbal Stabilizer for Cameras Canon/Sony/Panasonic/Nikon/Fujifilm, 2 kg (4.4 lbs) Tested Payload, Camera Gimbal with Native Vertical Shooting, Black |
|
| 9 | DJI Osmo Mobile 7P Gimbal Stabilizer for iPhone, Android, Native Tracking, Lighting, 3-Axis Phone Gimbal, Quick Launch, One-Tap Edit, Built-in Extension Rod & Tripod, 10hrs Use, Phone Charging |
|
| 10 | DJI Osmo Mobile 8 Advanced Tracking Combo Gimbal Stabilizer for Phone, AI Native Tracking with Audio & Lighting, 360° Pan Rotation, Built-in Extension Rod & Tripod, 10h Battery, Extension Rod |
|
Before you even think about adjusting your gimbal, prepare your camera exactly as it will be used for shooting. This means attaching all accessories you intend to use, including lens caps removed, lens hood, any filters, a fully charged battery, and an SD card. Any change in weight or weight distribution after balancing will throw off your calibration.
For zoom lenses, a crucial tip is to set your lens to its middle focal length (e.g., for a 24-70mm lens, set it to around 45-50mm). This acts as a compromise, ensuring that neither the widest nor the longest end of your zoom range overly stresses the gimbal motors, allowing for minor focal length adjustments during shooting without a complete rebalance.
Balancing the Tilt Axis (Forward/Backward and Up/Down)
The tilt axis is typically the first point of adjustment. First, ensure your camera is securely mounted onto the gimbal’s quick-release plate. Loosen the forward/backward adjustment on the tilt arm and carefully tilt your camera forward and backward. If the camera consistently tips forward, slide it backward on the plate. If it tips backward, slide it forward. Continue making small adjustments until the camera stays level at any angle you position it. Lock this adjustment once balanced.
Next, address the vertical tilt. Point your camera straight up or straight down. If it doesn’t stay in place, loosen the vertical adjustment knob on the gimbal arm (the one that allows the camera to move up and down relative to the handle). Adjust this arm until the camera remains pointing upward or downward without your assistance. This ensures the center of gravity is aligned with the tilt motor’s axis of rotation.
Balancing the Roll Axis (Left/Right)
With the tilt axis locked, move to the roll axis. Unlock the roll axis and gently tilt your gimbal side to side. If your camera leans to one side, loosen the corresponding adjustment and slide the camera either left or right until it remains perfectly level, regardless of the gimbal’s orientation. The goal is for the camera to stay centered and upright without any sway. Lock the roll axis once this is achieved.
Balancing the Pan Axis (Rotational)
Finally, tackle the pan axis. Unlock it and hold the gimbal horizontally, tilting the handle slightly. If the camera swings or rotates on its own, adjust the pan arm (the horizontal bar on which the other axes are mounted) until the camera remains still. Once the camera holds its position when you tilt the gimbal, lock the pan axis.
Fine-Tuning and Auto-Calibration
Even with meticulous manual balancing, your gimbal’s motors will benefit from electronic calibration. Power on your gimbal and allow it to initialize. Most modern gimbals feature an auto-tune function, usually accessible through their dedicated smartphone app. Running this function allows the gimbal to analyze your camera’s weight and adjust its motor power settings accordingly. This final step optimizes motor performance, reduces strain, and ensures the smoothest possible footage.
Essential Tools and Accessories for Better Balance
When working with long lenses, certain accessories become indispensable for achieving and maintaining optimal balance:
- Counterweights: These small weights attach to various parts of your gimbal to offset the front-heavy nature of long lenses, helping to redistribute weight and lighten the load on your gimbal’s motors.
- Lens Support Brackets: For extremely long lenses, a lens support bracket mounted to your camera cage or quick-release plate can provide additional stability, preventing lens sag and reducing strain on your camera’s lens mount.
- Long Lens Plates (Arca-Swiss Compatible): A longer quick-release plate provides more flexibility for sliding your camera forward or backward, which is crucial for finding the precise balance point for extended lenses. Ensure compatibility with your gimbal’s mounting system.
Troubleshooting Common Balancing Issues
Even after following the steps, you might encounter issues. Here are common problems and their solutions:
- Persistent Vibrations or Jitters: This often indicates a slight imbalance that the motors are struggling to correct. Re-check each axis meticulously, making smaller adjustments. Ensure all locks are tightened.
- Gimbal Motors Overheating or Straining: Your setup might be too heavy, or the balance is significantly off, forcing the motors to work overtime. Reduce unnecessary accessories, add counterweights if needed, and run the auto-tune function to adjust motor power.
- Camera Drifting or Tilting: This suggests an axis is still slightly unbalanced or a lock is loose. Go back and fine-tune the affected axis, ensuring all locking mechanisms are secure.
Buying Guide: Tips for Maintaining Optimal Balance
Maintaining a perfectly balanced gimbal setup, especially with diverse lens configurations, extends beyond the initial calibration. Consider these expert tips:
- Regular Re-Checks: Even minor changes, like swapping an SD card or a slight zoom adjustment, can affect balance. Develop a habit of quickly checking your gimbal’s balance before each shoot, or even between significant changes during a shoot.
- Understand Payload Limits: Always be aware of your gimbal’s maximum payload capacity. Pushing beyond this limit will inevitably lead to motor strain, poor performance, and potential damage, regardless of how well you attempt to balance it.
- Balance with Your Final Configuration: Never balance an empty camera or a lens without its hood if you plan to use them. The rule of thumb is: whatever you shoot with, balance with.
“Mastering gimbal balance isn’t just a technical skill; it’s an art that transforms good footage into great. The subtle shifts a perfectly balanced setup provides make all the difference.” – Admin, StabilizerPro.com
Conclusion
Balancing long lenses on your gimbal setup is a fundamental skill that significantly impacts the quality of your video. By diligently following the step-by-step process of preparing your gear, adjusting each axis with precision, and utilizing essential accessories like counterweights, you can overcome the challenges posed by heavy optics. Remember that a properly balanced gimbal translates to less motor strain, extended battery life, and most importantly, consistently smooth, professional-looking footage.
Are you ready to take your videography to the next level with perfectly stable shots?
Frequently Asked Questions
Why is balancing my gimbal with long lenses so crucial?
Balancing prevents motor strain, reduces battery drain, and eliminates unwanted vibrations or jitters in your footage. An unbalanced setup forces the gimbal’s motors to work harder, leading to overheating, potential damage, and ultimately, shaky video that defeats the purpose of using a stabilizer.
Can I use a zoom lens and still keep my gimbal balanced when changing focal lengths?
Yes, but it requires a compromise. The best practice is to balance your zoom lens at its middle focal length. This way, the gimbal’s motors can handle minor adjustments to the zoom without requiring a full rebalance, although extreme changes in focal length might still necessitate slight adjustments.
What should I do if my gimbal struggles to balance my long lens, even after following all steps?
If your gimbal still struggles, first verify that your camera and lens combination is within your gimbal’s specified payload capacity. If it is, consider adding counterweights or a lens support bracket to redistribute the weight more effectively. Running the auto-tune function after these adjustments can further optimize motor performance.