Have you ever watched a video that flawlessly speeds through a vibrant city street or captures a breathtaking landscape transforming with rapid movement, leaving you wondering how such a mesmerizing effect is achieved? This captivating technique is called hyperlapse, and with the advent of camera gimbals, creating these dynamic, smooth, and professional-looking videos has become more accessible than ever before. If you’re ready to elevate your filmmaking skills and learn How To Create A Hyperlapse Video Using A Gimbal, you’ve come to the right place. We’ll dive into everything from essential gear and meticulous planning to shooting techniques and post-production secrets, ensuring your next project is a cinematic masterpiece.
What is a Camera Stabilizer, and Why Do You Need It for Hyperlapse?
A camera stabilizer is a device designed to keep your camera steady, eliminating unwanted shakes and jitters that can ruin footage. While there are various types, such as tripods, sliders, and Steadicams, gimbals are a class of motorized stabilizers that use sophisticated algorithms and brushless motors to counteract motion across multiple axes (typically three: pan, tilt, and roll). They are indispensable for achieving incredibly smooth, fluid camera movements, especially when you are moving physically.
For hyperlapse videos, where the camera moves significantly between each captured frame, a gimbal is absolutely crucial. A hyperlapse is essentially a time-lapse with added camera movement, creating an illusion of rapid travel through space and time. Without a gimbal, even the slightest hand tremor or uneven step would result in jarring, unusable footage. The gimbal ensures that each still image is captured from a stable platform, allowing for seamless transitions when these images are later stitched together into a video. This results in a professional, cinematic look that captivates viewers and tells a compelling story through accelerated motion.
Essential Gear for Your Gimbal Hyperlapse Journey
Embarking on a hyperlapse project with a gimbal requires more than just the stabilizer itself. Having the right supporting equipment is vital for a smooth workflow and high-quality results.
- Camera: Whether you’re using a professional DSLR, a mirrorless camera, or even a modern smartphone, ensure your camera can shoot in full manual mode and, ideally, capture RAW image files for maximum flexibility in post-production.
- Wide-Angle Lens: A wide-angle lens is highly recommended as it minimizes the appearance of ‘camera move blur’ and allows for longer exposure times without excessive blurring of the main subject. This creates a more immersive field of view and helps maintain sharpness across the frame.
- ND Filter (Neutral Density Filter): Essential for shooting hyperlapses in bright conditions. An ND filter reduces the amount of light entering your lens, allowing you to use longer shutter speeds to introduce pleasing motion blur, even during the day.
- Intervalometer: This device (or a built-in camera/gimbal app feature) automatically triggers your camera’s shutter at precise, consistent intervals. Consistency is key for smooth hyperlapses.
- Gimbal: A reliable 3-axis gimbal is the star of the show. Options range from compact smartphone gimbals (like the DJI Osmo Mobile series) to robust professional gimbals for DSLRs and mirrorless cameras (such as the DJI RS series or Zhiyun Crane/Weebill lines). Choose one that can comfortably support your camera’s weight and has good battery life.
- Tripod Base: Many gimbals come with a small tripod base that can be attached for balancing or for placing the gimbal down during breaks.
- External Display or Remote Control (Optional): These can offer a clearer view of your framing and settings, improving accuracy and efficiency, especially for complex shots.
Planning Your Hyperlapse with a Gimbal Stabilizer
Effective planning is the bedrock of any successful hyperlapse. Rushing into a shoot without a clear vision often leads to frustrating results.
Location Scouting and Timing
|
Our Picks for the Best Camera Stabilizer in 2026
As an Amazon Associate I earn from qualifying purchases.
|
||
| Num | Product | Action |
|---|---|---|
| 1 | DJI RS 3 Mini, 3-Axis Gimbal Stabilizer for Cameras Canon/Sony/Panasonic/Nikon/Fujifilm, 2 kg (4.4 lbs) Tested Payload, Camera Gimbal with Native Vertical Shooting, Black |

|
| 2 | ZHIYUN CINEPEER Weebill 3E [Official], 3-Axis Lightweight Gimbal Stabilizer for DSLR & Mirrorless Camera Canon/Sony/Panasonic/Nikon, 3KG Payload, Native Vertical Shooting, Bluetooth Shutter Control |
|
| 3 | DJI Osmo Mobile 7P Gimbal Stabilizer for iPhone, Android, Native Tracking, Lighting, 3-Axis Phone Gimbal, Quick Launch, One-Tap Edit, Built-in Extension Rod & Tripod, 10hrs Use, Phone Charging |
|
| 4 | FeiyuTech SCORP 3 Gimbal Stabilizer for Camera, Built-in AI Tracking Sensor & Detachable Remote Control, 3.5KG Payload Camera Stabilizer with Touch Screen, Vertical Shooting |
|
| 5 | Zeadio Video Action Stabilizing Handle Grip Handheld Stabilizer with Cold-Shoe Mount for All DSLR Camera Camcorder |
|
| 6 | DJI Osmo Mobile 7 Gimbal Stabilizer for iPhone, Android, Built-in Tripod, Portable Stabilizer for iPhone, Selfie Stick, 3-Axis Phone Gimbal, ActiveTrack 7.0, One-Tap Edit, 10hrs Use, Phone Charging |
|
| 7 | FeiyuTech SCORP 2 Gimbal Stabilizer for DSLR and Mirrorless Camera, Integrated Al Tracking Sensor, 3-Axis Camera Stabilizer for Sony Canon Panasonic Nikon, 2.5kg Payload Touch Screen Vertical Shooting |
|
| 8 | DJI Osmo Mobile 8 Advanced Tracking Combo Gimbal Stabilizer for Phone, AI Native Tracking with Audio & Lighting, 360° Pan Rotation, Built-in Extension Rod & Tripod, 10h Battery, Extension Rod |
|
| 9 | 3-Shoe DSLR/Mirrorless/Action Camera Camcorder Phone Stabilizer Expansion Cage Mount Moviemaking Holder Rig YouTube Tiktok Vlogging Video Kit Compatible with GoPro Canon Nikon Sony iPhone Android |
|
| 10 | Zeadio Camera Stabilizer Kit, All-in-One Handheld Stabilizer with LED Video Light, Microphone, Phone Holder & Action Camera adaper, Fits for All Camera, DSLR, Action Camera and All Smartphones |
|
Begin by scouting visually stimulating environments that offer interesting elements to capture. Consider bustling city streets, serene parks, iconic architectural marvels, or dynamic urban skylines. The chosen setting should provide compelling context and movement. Pay close attention to ambient lighting; the “golden hour” (shortly after sunrise or before sunset) bathes your shots in soft, warm tones, enhancing depth and atmosphere. Always consider weather conditions and the time of day, as these factors significantly influence the mood and clarity of your footage.
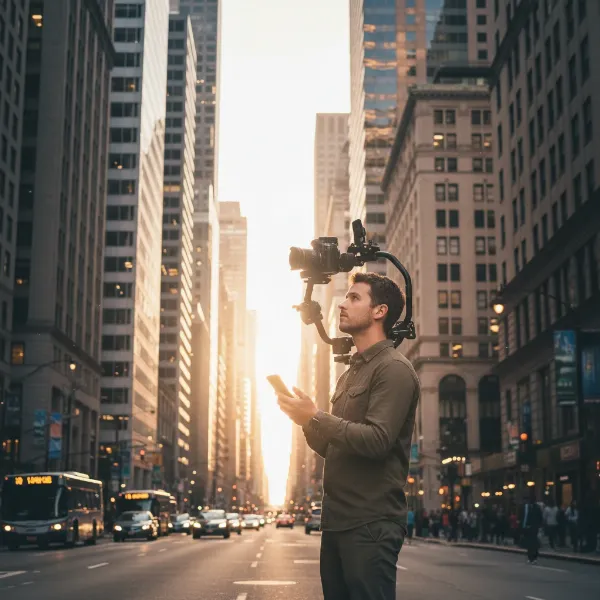 A videographer scouting a city street for hyperlapse, planning shot with gimbal.
Developing Your Shot List or Storyboard
Before heading out, develop a clear shot list or storyboard. Outline each shot, detailing your intended camera path, the main subject you’ll track, and any specific movements you plan to execute. This preparation helps you anticipate camera paths, fine-tune movements, and minimizes the risk of missing critical moments. A well-thought-out plan ensures a smooth hyperlapse experience from start to finish.
Essential Camera Settings for Hyperlapse
Achieving a clean, consistent hyperlapse relies heavily on precise manual camera settings.
- Manual Mode (M): Always shoot in manual mode. Auto settings can cause flickering due to varying exposure or white balance between frames [Gimbal Hyperlapse Fail Tutorial search result 2].
- Shutter Speed: Use a relatively long shutter speed, typically between 0.5 and 1 second. This is crucial for introducing natural motion blur to moving elements (like cars or people), which enhances the illusion of speed and creates a more cinematic look [cite: 1, Handheld Hyperlapse with a Gimbal search result 3 from initial search].
- Aperture (f-stop): Set a higher f-stop (e.g., f/8 to f/16) to ensure a greater depth of field. This keeps more of your scene in focus, which is particularly important for hyperlapses with a moving camera [Gimbal Hyperlapse Fail Tutorial search result 2].
- ISO: Keep your ISO as low as possible (e.g., ISO 100 or 200) to minimize digital noise and maximize image quality. Adjust it only if absolutely necessary for proper exposure [Gimbal Hyperlapse Fail Tutorial search result 2].
- White Balance: Set your white balance manually to a fixed value (e.g., Daylight, Cloudy, or a specific Kelvin temperature). This prevents color shifts between frames [Gimbal Hyperlapse Fail Tutorial search result 2].
- Focus: Manual focus is paramount. Set your lens to infinity focus, especially when using wide-angle lenses and higher f-stops. This ensures everything from foreground to background remains sharp throughout your movement [Gimbal Hyperlapse Fail Tutorial search result 2].
- File Format: Shoot in RAW format. RAW files retain significantly more image data than JPEGs, offering greater flexibility for exposure adjustments, color grading, and noise reduction in post-production [How to Create a Hyperlapse Video Using a Gimbal search result 5 in initial search].
Preparing Your Gimbal
Correct gimbal setup is just as important as camera settings.
- Balance First: Before powering on your gimbal, meticulously balance your camera on all three axes (pan, tilt, roll). A perfectly balanced camera reduces strain on the gimbal motors, conserves battery life, and ensures the smoothest possible operation.
- Gimbal Mode: Once balanced and powered on, set your gimbal to “Lock Mode” or a similar setting (often called FPV mode on some gimbals). In this mode, the camera maintains a fixed orientation relative to your chosen subject or direction, regardless of your body’s subtle movements [cite: 1, DJI OM 6 – Ultimate Hyperlapse Tutorial search result 4 from initial search].
- Motor Strength/Smoothness: If your gimbal allows, fine-tune its motor strength and smoothness settings. This can optimize its responsiveness to your movements and reduce micro-jitters.
- Camera Aids: Utilize your camera’s grid overlay to help maintain consistent framing, especially if you’re tracking a specific point in the scene [How to Create a Hyperlapse Video Using a Gimbal search result 5 in initial search].
Executing Your Hyperlapse: Techniques for Smooth Movement
With your gear prepped and settings dialed in, it’s time to capture those frames. Consistent, controlled movement is the heart of a compelling hyperlapse.
- The Gimbal Walk: Adopt a specific walking technique to minimize vertical camera bounce. Bend your knees slightly and walk with a smooth, heel-to-toe motion. Imagine gliding rather than stepping. This “ninja walk” or “gimbal walk” is essential for ultra-smooth footage [How To Film a Hyperlapse With a Gimbal! – Zhiyun Weebill 3 search result 4 from initial search].
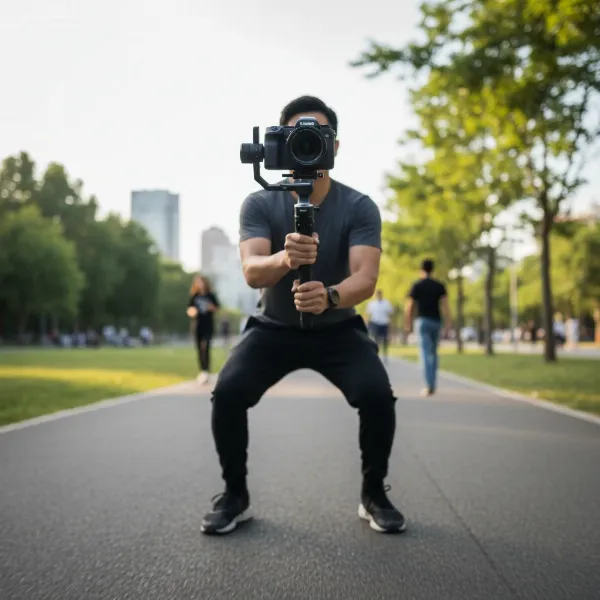 Person demonstrating the smooth gimbal walk for hyperlapse video.
 - Consistent Pacing and Intervals: Maintain a slow, steady, and consistent walking pace. Combined with your intervalometer, this ensures that the distance covered between each photo is uniform, leading to fluid motion in the final video. More frequent intervals will result in a faster-paced video, while longer intervals create a more gradual, cinematic movement.
- Maintaining a Focal Point: A common hyperlapse technique involves keeping a specific object or “anchor point” fixed in your frame as you move around it or towards it. This creates a powerful, dynamic perspective. Use your gimbal’s joystick or app controls subtly to adjust your pan or tilt to keep the subject centered [Gimbal Hyperlapse Fail Tutorial search result 2]. For curved paths, delay your panning motion slightly until you’ve covered a segment of the curve, then smoothly pan to realign your target. This helps avoid jerky rotations [How To Film a Hyperlapse With a Gimbal! – Zhiyun Weebill 3 search result 4 from initial search].
- Shoot Enough Frames: Don’t cut your shoot short. A general rule of thumb is that you need at least 24 pictures for every second of desired hyperlapse footage. Aim for a final clip that is at least 3-4 seconds long, meaning you’ll need approximately 72-96 images, often more, depending on your interval [Common Hyperlapse Mistakes Gimbal search result 1]. It’s better to have too many frames than too few.
- Monitor Equipment: Regularly check your gimbal’s battery level and your camera’s remaining storage. Changing batteries mid-shoot for a hyperlapse can be disruptive and should be avoided if possible [How to Create a Hyperlapse Video Using a Gimbal search result 5 in initial search].
Post-Processing: Refining Your Hyperlapse Videos
The magic of hyperlapse truly comes alive in post-production. This is where individual frames transform into a cohesive, fast-moving narrative.
- Import and Organize: Offload your RAW images to a fast hard drive. Import them into a photo editing program like Adobe Lightroom for initial organization and basic adjustments (exposure, white balance, lens correction). Apply the same adjustments to all images in the sequence for consistency.
- Assemble as Sequence: Import your adjusted photos as an image sequence into a video editing or compositing software (e.g., Adobe After Effects, Adobe Premiere Pro, DaVinci Resolve, or even mobile apps like CapCut for smartphone footage) [cite: 1, 3, DJI OM 6 – Ultimate Hyperlapse Tutorial search result 4 from initial search].
- Stabilization:
- Warp Stabilizer: Apply a software stabilizer like Adobe After Effects’ Warp Stabilizer. This powerful tool analyzes your footage and smooths out any remaining micro-jitters. A smoothness setting of around 10% is often a good starting point.
- Manual Refinement: For more complex hyperlapses or to achieve truly perfect stabilization, consider adding a single-point manual track on your designated anchor point after applying Warp Stabilizer. This ensures the target remains absolutely fixed in the frame, yielding unparalleled smoothness, especially when the footage is sped up [Common Hyperlapse Mistakes Gimbal search result 1].
- Speed Ramping: Speed up your footage to create the hyperlapse effect. Experiment with different speeds (e.g., 500% to 2000% or more) to find what works best for your scene. You can also speed ramp, transitioning from real-time into the hyperlapse for a dramatic effect [Fast & Easy HYPERLAPSE using a GIMBAL search result 3 from initial search].
- Color Grading and Sound: Apply a final color grade to enhance the visual impact and match the mood of your video. Add an appropriate audio track, ambient music, or sound effects to heighten the sense of motion and storytelling [cite: 3, How To Film a Hyperlapse With a Gimbal! – Zhiyun Weebill 3 search result 4 from initial search].
- Export: Export your final hyperlapse video in your desired resolution and format.
Comparison: Gimbal Hyperlapse vs. Other Techniques
Understanding how gimbal hyperlapse stands apart from other time-compression techniques can clarify its unique advantages.
| Feature | Gimbal Hyperlapse | Traditional Hyperlapse (Tripod) | Timelapse (Tripod) | Motionlapse (Motion Control) |
|---|---|---|---|---|
| Camera Movement | Smooth, continuous handheld movement | Step-by-step physical movement of tripod between shots | Fixed position | Pre-programmed, precise motion between fixed points |
| Stabilization | Excellent due to gimbal’s active stabilization | Relies heavily on post-production software | Camera is static, so no stabilization needed | Precise and smooth due to automated rig |
| Motion Blur | Achieved with longer shutter speeds while moving | Possible with longer shutter speeds | Primarily from moving subjects, not camera | Achieved similarly to gimbal hyperlapse |
| Ease of Use | Easier for dynamic, on-the-go movement | More laborious, requires precise marking | Relatively straightforward, set-and-forget | Requires specialized, often expensive, equipment |
| Ideal Scenarios | Urban exploration, tracking subjects, dynamic perspectives | Straight paths, subtle curves, precise anchor points | Sunrises/sunsets, cloud movement, construction | Automated cinematic camera moves |
Top Camera Stabilizers for Hyperlapse
While many gimbals can facilitate hyperlapse, some brands consistently offer robust performance and features ideal for this technique.
For DSLR/Mirrorless Cameras
- DJI RS Series (e.g., RS 3 Pro, RS 4): Renowned for their robust build, powerful motors, extensive payload capacity, and intelligent features. DJI gimbals often include advanced tracking modes and excellent app integration, simplifying hyperlapse creation.
- Zhiyun Crane/Weebill Series (e.g., Crane 4, Weebill 3S): Zhiyun gimbals are known for their ergonomic designs, powerful motors, and innovative features, often offering a good balance of performance and affordability. Their ease of balancing and intuitive controls make them a favorite among many videographers.
For Smartphones
- DJI Osmo Mobile Series (e.g., OM 6, Osmo Mobile SE): These compact and highly portable gimbals are perfect for smartphone users. They integrate seamlessly with companion apps that often include dedicated hyperlapse modes, making the process incredibly user-friendly. Their ActiveTrack features can also be leveraged for creative hyperlapse shots.
- Zhiyun Smooth Series (e.g., Smooth 5S): Zhiyun’s smartphone gimbals offer excellent stabilization and a wide range of features, often appealing to users looking for more manual control and versatile shooting options with their mobile devices.
These models, or their newer iterations, represent some of the best choices for videographers looking to create stunning hyperlapse content with a gimbal.
Buying Guide: Expert Advice for Choosing Your Hyperlapse Gimbal
As an Admin of StabilizerPro.com with over a decade of experience in Camera Stabilizers, I’ve seen countless advancements and learned what truly matters. Choosing the right gimbal for hyperlapse is a critical decision.
- Define Your Camera System: First, determine whether you’ll be using a smartphone, action camera, mirrorless, or DSLR. The gimbal’s payload capacity must match or exceed your camera-and-lens combination. Overloading a gimbal will compromise its performance and potentially damage the motors.
- Consider Battery Life: Hyperlapse shoots can be lengthy, often requiring you to capture hundreds or even thousands of frames. A gimbal with a long battery life is non-negotiable. Check reviews for real-world battery performance, and consider carrying extra batteries if your model allows.
- Ease of Use and Portability: While professional gimbals offer advanced features, consider how easy it is to balance, set up, and operate. For run-and-gun hyperlapse, a lighter, more portable gimbal might be preferable, but ensure it doesn’t compromise on stability.
- Feature Set and App Integration: Look for gimbals with dedicated hyperlapse modes or robust companion apps that offer precise control over intervals, exposure, and tracking. Features like object tracking, motion lapse capabilities, and intuitive joystick controls can greatly enhance your creative options.
- Read Reviews and Watch Tutorials: Don’t just rely on specifications. Read independent reviews and watch video tutorials to see the gimbal in action, particularly for hyperlapse applications. Pay attention to how users describe the setup process, stability, and overall user experience.
- Warranty and Support: Invest in a reputable brand that offers solid customer support and a good warranty. This provides peace of mind in case of any issues with your equipment.
“A gimbal doesn’t just stabilize; it empowers your movement. For hyperlapse, it transforms choppy steps into soaring cinematic journeys. But remember, the best gimbal is the one you understand and can balance perfectly.” – Alex Chen, Lead Videographer at StabilizePro.com
Conclusion
Creating breathtaking hyperlapse videos with a gimbal is a rewarding endeavor that seamlessly blends the art of time-lapse photography with dynamic camera movement. By meticulously planning your shots, mastering your camera and gimbal settings, employing smooth walking techniques, and refining your footage in post-production, you can produce stunning visual narratives that truly stand out. Remember that practice is key, so don’t be afraid to experiment with different locations, movements, and settings. With your gimbal as your trusted companion, the world becomes your cinematic canvas, ready for you to capture its essence in accelerated motion.
What incredible journey will your next gimbal hyperlapse take us on?
Frequently Asked Questions
How many photos do I need for a good hyperlapse?
For a smooth hyperlapse, aim for at least 24 photos for every second of desired final footage. For example, a 10-second hyperlapse would require a minimum of 240 photos. However, shooting more frames (e.g., for a 3-4 second final clip) provides more flexibility in editing and allows for smoother speed adjustments. [Common Hyperlapse Mistakes Gimbal search result 1]
Should I use video mode or photo mode for hyperlapse?
While some modern cameras and gimbals offer built-in video hyperlapse modes, shooting individual still photos (RAW format recommended) generally provides the highest quality and most flexibility for post-production. Still photos allow for greater control over exposure, focus, and color grading, leading to a more professional final product.
What causes flickering in hyperlapse videos?
Flickering in hyperlapse is typically caused by inconsistent exposure, white balance, or focus between frames. To avoid this, always shoot in full manual mode, setting your ISO, aperture, shutter speed, white balance, and focus (preferably to infinity) to fixed values throughout the entire shoot.
How do I get good motion blur in my hyperlapse?
To achieve pleasing motion blur, especially with moving subjects, use a slower shutter speed for each individual photo. A shutter speed of 0.5 to 1 second is often ideal. This allows moving elements in your scene to blur slightly, enhancing the illusion of speed and creating a more cinematic look.
Can I create a hyperlapse with a smartphone gimbal?
Absolutely! Many modern smartphone gimbals (like the DJI Osmo Mobile series or Zhiyun Smooth series) have dedicated hyperlapse modes and excellent stabilization. While the image quality might not match a professional camera, smartphone gimbals make hyperlapse creation incredibly accessible and can produce impressive results for casual or social media use.