Stepping into the world of professional videography often means elevating your gear beyond the basics. While a camera gimbal provides the foundational stability for buttery-smooth footage, unlocking its full potential truly begins when you strategically rig it with essential accessories: external monitors, professional microphones, and versatile lighting. This guide will walk you through the nuanced process of transforming your simple gimbal setup into a powerhouse production tool, ensuring every shot you capture is perfectly framed, flawlessly lit, and accompanied by crystal-clear audio. Get ready to elevate your filmmaking game by mastering the art of gimbal rigging.
What is a Gimbal Stabilizer, and Why Rig It with Accessories?
A gimbal stabilizer is a pivotal piece of equipment in modern videography, employing motors and advanced algorithms to counteract unwanted camera movements, thereby producing incredibly smooth and stable video footage. Primarily used for handheld shots, these devices effectively eliminate shakes, jitters, and bumps that would otherwise ruin a take, making them indispensable for everything from casual vlogging to cinematic productions. While a basic gimbal offers superior stabilization, its true versatility emerges when it’s augmented with external accessories.
Rigging your gimbal with monitors, microphones, and lights isn’t just about adding more gadgets; it’s about fundamentally enhancing your workflow and the quality of your output. An external monitor provides a larger, clearer view for critical focus and framing, especially vital when your camera’s built-in screen is too small or awkwardly positioned. A high-quality microphone captures pristine audio, moving beyond the often-compromised sound from internal camera mics. Lastly, compact lights offer crucial fill or key illumination, allowing you to maintain visual quality in challenging lighting conditions or achieve specific creative effects. Together, these additions transform your gimbal into a comprehensive, mobile filmmaking studio.
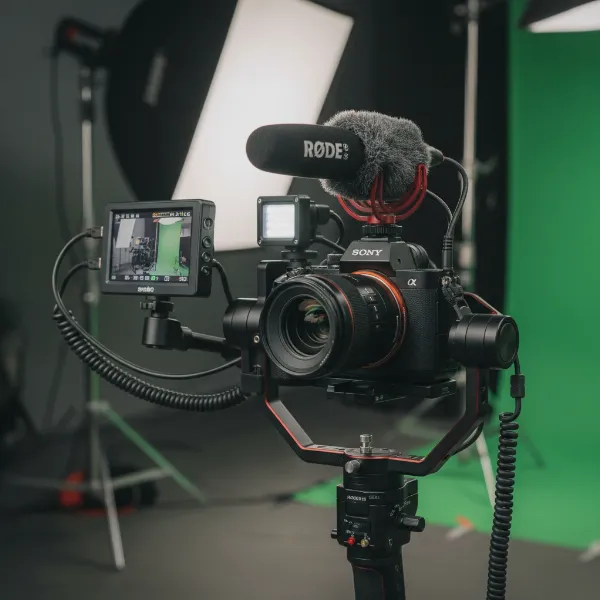 A professional camera gimbal rig setup with an external monitor, microphone, and LED light.
Essential Factors for Rigging Your Gimbal Setup
Successfully rigging a gimbal involves more than simply attaching accessories; it requires thoughtful consideration of several key factors to ensure optimal performance, balance, and ease of use. Overlooking these elements can lead to an unwieldy setup, poor stabilization, or even damage to your equipment.
Type of Camera & Gimbal
|
Our Picks for the Best Camera Stabilizer in 2026
As an Amazon Associate I earn from qualifying purchases.
|
||
| Num | Product | Action |
|---|---|---|
| 1 | 3-Shoe DSLR/Mirrorless/Action Camera Camcorder Phone Stabilizer Expansion Cage Mount Moviemaking Holder Rig YouTube Tiktok Vlogging Video Kit Compatible with GoPro Canon Nikon Sony iPhone Android |

|
| 2 | FeiyuTech SCORP 3 Gimbal Stabilizer for Camera, Built-in AI Tracking Sensor & Detachable Remote Control, 3.5KG Payload Camera Stabilizer with Touch Screen, Vertical Shooting |
|
| 3 | DJI Osmo Mobile 7P Gimbal Stabilizer for iPhone, Android, Native Tracking, Lighting, 3-Axis Phone Gimbal, Quick Launch, One-Tap Edit, Built-in Extension Rod & Tripod, 10hrs Use, Phone Charging |
|
| 4 | DJI Osmo Mobile 8 Advanced Tracking Combo Gimbal Stabilizer for Phone, AI Native Tracking with Audio & Lighting, 360° Pan Rotation, Built-in Extension Rod & Tripod, 10h Battery, Extension Rod |
|
| 5 | ZHIYUN CINEPEER Weebill 3E [Official], 3-Axis Lightweight Gimbal Stabilizer for DSLR & Mirrorless Camera Canon/Sony/Panasonic/Nikon, 3KG Payload, Native Vertical Shooting, Bluetooth Shutter Control |
|
| 6 | DJI RS 3 Mini, 3-Axis Gimbal Stabilizer for Cameras Canon/Sony/Panasonic/Nikon/Fujifilm, 2 kg (4.4 lbs) Tested Payload, Camera Gimbal with Native Vertical Shooting, Black |
|
| 7 | DJI Osmo Mobile 7 Gimbal Stabilizer for iPhone, Android, Built-in Tripod, Portable Stabilizer for iPhone, Selfie Stick, 3-Axis Phone Gimbal, ActiveTrack 7.0, One-Tap Edit, 10hrs Use, Phone Charging |
|
| 8 | FeiyuTech SCORP 2 Gimbal Stabilizer for DSLR and Mirrorless Camera, Integrated Al Tracking Sensor, 3-Axis Camera Stabilizer for Sony Canon Panasonic Nikon, 2.5kg Payload Touch Screen Vertical Shooting |
|
| 9 | Zeadio Video Action Stabilizing Handle Grip Handheld Stabilizer with Cold-Shoe Mount for All DSLR Camera Camcorder |
|
| 10 | Zeadio Camera Stabilizer Kit, All-in-One Handheld Stabilizer with LED Video Light, Microphone, Phone Holder & Action Camera adaper, Fits for All Camera, DSLR, Action Camera and All Smartphones |
|
The foundation of any rigged setup is the compatibility between your camera and gimbal. Different gimbals have varying payload capacities, indicating the maximum weight they can effectively stabilize. Before adding any accessories, confirm that your camera, lens, and all intended additions will not exceed your gimbal’s weight limit. Additionally, consider the available mounting points on your gimbal. Many gimbals offer standard 1/4″-20 threaded holes, cold shoe mounts, or NATO rails, which are crucial for attaching expansion accessories. Larger, professional gimbals often provide more robust mounting options and even power outputs for external devices, simplifying cable management and battery life.
Budget & Accessory Quality
Your budget will inevitably influence the quality and range of accessories you can acquire. While it might be tempting to opt for the cheapest options, investing in reputable brands for monitors, mics, and lights often translates to better performance, durability, and reliability on set. Higher-quality accessories tend to have superior build materials, more advanced features, and better power efficiency. However, there’s a sweet spot; many mid-range options offer excellent value without breaking the bank. Prioritize accessories that directly address your immediate filmmaking needs and demonstrate a good balance between cost and performance.
Purpose of Use
The specific projects you undertake will dictate the most appropriate accessories for your gimbal. For instance, a run-and-gun vlogger might prioritize compact, lightweight accessories that are quick to set up and tear down, such as a mini shotgun mic and a small on-camera LED light. A filmmaker working on a short film might opt for a larger, more accurate field monitor for critical focus pulling and a more directional shotgun microphone for professional audio capture. Understanding your primary use case helps in selecting accessories that are genuinely beneficial rather than just adding unnecessary bulk and complexity.
Weight, Size, and Balancing
This is arguably the most critical factor when rigging a gimbal. Every accessory you add contributes to the overall weight and changes the center of gravity of your camera setup. Exceeding the gimbal’s payload capacity or failing to re-balance it correctly will result in poor stabilization, motor strain, and ultimately, unusable footage. You must account for the weight of monitors, microphones, lights, and all their associated mounting hardware and cables. Counterweights become essential when adding significant mass, helping to shift the center of gravity back into the gimbal’s operational sweet spot. Prioritizing compact and lightweight accessories whenever possible can simplify the balancing process.
Understanding Common Gimbal Accessories and Mounting Solutions
To effectively rig your gimbal, it’s crucial to understand the purpose and mounting methods for each accessory category. This knowledge empowers you to choose the right tools and integrate them seamlessly into your setup.
External Monitors
External monitors provide a larger, often brighter, and more detailed view of your camera’s feed than the built-in screen. This is invaluable for critical focus checks, precise framing, and monitoring exposure, especially when shooting in bright outdoor conditions or from awkward angles.
- Types: Most commonly, 5-inch or 7-inch field monitors are used, offering resolutions up to 1080p or even 4K. They typically connect via HDMI or SDI.
- Mounting: Flexible options are key. Magic arms are highly versatile, allowing for quick adjustments to the monitor’s position and angle. Articulating arms offer similar flexibility but are often more robust. Cold shoe mounts are common for smaller monitors, while NATO rail clamps provide a secure and quick-release solution, often paired with an L-bracket or cage for the monitor itself.
- Cable Management: Use short, coiled HDMI cables to minimize snagging and maintain a clean setup.
Microphones
High-quality audio is paramount for professional video. Relying solely on a camera’s internal microphone often leads to subpar sound, especially in noisy environments.
- Types: Compact shotgun microphones are popular for capturing directional audio, reducing ambient noise. Wireless lavalier microphone receivers are ideal for capturing dialogue from subjects, providing freedom of movement.
- Mounting: Most compact mics and wireless receivers feature a cold shoe mount for easy attachment to the gimbal’s existing cold shoe or an expansion plate. Consider using an extension bar if you need to position the microphone further away from the camera or to avoid capturing gimbal motor noise.
- Cable Routing: Route audio cables carefully, ensuring they don’t interfere with the gimbal’s motors or range of motion. Use cable ties or clips to secure them.
On-Camera Lights
Even with excellent ambient light, a small, controllable light source can dramatically improve your footage, providing fill light, eye lights, or subtle illumination in low-light scenarios.
- Types: Mini LED panel lights are incredibly popular due to their compact size, adjustable brightness, and often bi-color or RGB capabilities.
- Mounting: Most mini LED lights have a cold shoe adapter for direct mounting. Like monitors, they can also be attached via magic arms for more precise positioning and angling.
- Battery Life: Check the battery life of your chosen light and consider carrying spare batteries, as continuous use can drain them quickly.
Essential Mounting Hardware
The right hardware is the glue that holds your rigged gimbal together, providing flexibility, security, and stability.
- Cold Shoe Mounts & Adapters: Universally found on gimbals and cameras, they allow direct attachment of many accessories or serve as a base for other adapters.
- NATO Rails & Clamps: Offer a secure, quick-release mounting solution that can bear more weight than a cold shoe. Often used on gimbal cages or side handles.
- Magic Arms & Articulating Arms: Highly versatile, these allow for precise positioning of monitors and lights. Look for robust options with strong locking mechanisms.
- Expansion Plates & Gimbal Cages: These attach to your gimbal or camera and provide multiple additional mounting points (1/4″-20, 3/8″-16, cold shoe) for a more complex setup.
- Counterweights: Indispensable for re-balancing a gimbal after adding accessories. They come in various sizes and attach to specific parts of the gimbal, often the tilt or roll arm.
- Cable Management Solutions: Small cable ties, clips, and short, coiled cables are essential for keeping your setup clean and preventing snags.
Step-by-Step Guide: Rigging and Balancing Your Gimbal
Rigging your gimbal effectively is a methodical process. Rushing through it can lead to frustration and poor results. Follow these steps for a smooth setup.
1. Plan Your Setup
Before attaching anything, lay out all your accessories (camera, lens, monitor, mic, light, mounting hardware, cables). Visualize where each component will go, considering weight distribution and accessibility. This initial planning helps prevent redundant mounting and re-balancing. Think about how cables will run and if you have enough power for all devices.
2. Mount Your Monitor
Attach your external monitor using a magic arm, articulating arm, or a dedicated gimbal monitor mount. Choose a position that offers a clear line of sight without obstructing the camera or gimbal’s movements. Secure the mount tightly. Connect the HDMI or SDI cable from your camera to the monitor, ensuring the cable has enough slack for movement but is not excessively long or prone to snagging. Route the cable neatly using clips or ties.
3. Attach Your Microphone
Mount your chosen microphone or wireless receiver to an available cold shoe on the gimbal or an expansion plate. Position it to capture optimal audio, ideally slightly forward and away from the gimbal motors to minimize operational noise. Connect the audio cable from the mic to your camera’s input. Again, use a short, coiled cable if possible, and secure it to prevent tangles.
4. Integrate Your Lights
Secure your mini LED light using a cold shoe mount or a magic arm. Consider the lighting effect you want to achieve. For fill light, a position near the top of the camera might work well. For more directional light, an arm can provide greater flexibility. Ensure the light’s power source is accessible and that its cables are managed cleanly.
5. The Critical Step: Balancing Your Gimbal
This is where all your efforts culminate. Proper balancing is paramount for stable footage and to prevent motor strain.
- Initial Camera Balance: Start by balancing your camera and lens without any accessories, following your gimbal’s specific balancing instructions.
- Re-balancing with All Accessories: Once all your accessories are attached, the center of gravity will have shifted. Now, you must re-balance each axis (tilt, roll, pan) with everything connected. This often requires the use of counterweights. Attach counterweights to the appropriate gimbal arm (typically the tilt or roll arm) to offset the added weight of your monitor, mic, or light.
- Fine-Tuning: Spend time meticulously fine-tuning each axis until the camera remains perfectly still at any angle when the motors are off. A perfectly balanced gimbal will move freely and smoothly with minimal motor effort. This step is crucial for achieving truly cinematic, stable footage.
“Balancing your gimbal with a full rig can be challenging, but it’s where the magic truly happens. Take your time, use counterweights, and remember that even a slight imbalance can compromise your shot.” – Sarah Chen, Professional Videographer & Stabilizer Specialist
A videographer meticulously adjusting counterweights on a gimbal for perfect balance and stability.
Top-Rated Gimbal Accessories for Enhanced Rigging
While many brands offer excellent accessories, certain products have become industry favorites for their reliability, performance, and compatibility.
SmallRig NATO Rail with Cold Shoe Mount – Versatile Expansion
SmallRig is renowned for its robust and intelligently designed camera accessories. Their NATO Rail with Cold Shoe Mount attachment is a simple yet incredibly effective tool. It allows you to add multiple cold shoe mounting points to any NATO rail, significantly expanding your gimbal’s accessory capacity. Its quick-release functionality is a huge plus for rapid setup and breakdown. Ideal for mounting receivers, small lights, or even a second monitor mount.
Rode VideoMic NTG – Compact Professional Audio
The Rode VideoMic NTG is a highly versatile on-camera shotgun microphone that’s perfect for gimbal use. Its compact size and lightweight design minimize the impact on gimbal balance, while its broadcast-quality sound capture elevates your audio. It features a USB-C output for direct recording and a handy gain control. It’s a favorite among vloggers and filmmakers for its excellent performance in a small footprint.
Feelworld F5 Pro V4 Monitor – Affordable & Feature-Rich
Feelworld monitors consistently offer impressive features at an accessible price point. The F5 Pro V4 is a 5.5-inch 1080p field monitor with a bright display, touch screen interface, and professional monitoring tools like waveform, vectorscope, and 3D LUT support. It’s lightweight enough for most gimbals and often includes handy power outputs to charge your camera or other accessories. A great choice for those needing a clear, reliable viewing experience.
Aputure MC Mini LED Panel Light – Powerful Pocket Lighting
The Aputure MC is an incredibly compact RGBWW LED light that packs a punch. Despite its pocket size, it offers full-color control, adjustable color temperature, and powerful output, all controllable via an app. It’s lightweight, easy to mount on a cold shoe, and perfect for adding subtle fill light, eye lights, or creative splashes of color to your gimbal shots. Its built-in magnet also allows for creative mounting options.
Maintenance and Best Practices for Your Rigged Gimbal
Proper care and consistent best practices will ensure your rigged gimbal remains a reliable tool for years to come.
- Regular Cleaning and Inspection: After each use, wipe down your gimbal and accessories to remove dust and grime. Regularly check all screws and mounting points for tightness. Inspect cables for any fraying or damage.
- Proper Storage: When not in use, store your gimbal and its accessories in a protective case, especially during transport. This prevents physical damage and keeps components organized.
- Software Updates: Periodically check for firmware updates for your gimbal and smart accessories. Manufacturers often release updates that improve performance, add features, or fix bugs.
- Learning Effective Gimbal Operation with Added Weight: A rigged gimbal will feel different from a bare one. Practice operating your fully loaded setup to get accustomed to its new weight and balance. Experiment with different walking styles and movements to maintain smoothness.
Where to Source Your Gimbal Rigging Gear
Acquiring your gimbal accessories from reputable sources is crucial for ensuring product authenticity, reliability, and good customer support.
- Online Retailers: Large online photography and videography stores like B&H Photo Video, Adorama, and Amazon are excellent sources. They offer a vast selection, competitive pricing, and often provide customer reviews that can guide your purchasing decisions.
- Specialty Camera Stores: Local or regional camera shops often have knowledgeable staff who can provide hands-on advice and allow you to test equipment before buying.
- Manufacturer Websites: Purchasing directly from the manufacturer (e.g., Rode, Aputure, Feelworld) ensures you get genuine products and direct access to their customer support and warranty services.
- Important Considerations: Always check the seller’s return policy, warranty information, and read recent customer reviews before making a purchase. This safeguards your investment and ensures peace of mind.
Expert Buying Guide: Tips from a Gimbal Veteran
Drawing on years of experience, here’s some practical advice to guide your gimbal rigging journey:
- Prioritize Balancing Above All Else: A fully rigged gimbal that isn’t perfectly balanced is worse than a bare, unbalanced one. Invest in good counterweights and dedicate ample time to the balancing process. It’s the single most important factor for smooth footage.
- Invest in Quality Mounting Hardware: Cheap magic arms or cold shoe adapters can fail, leading to damaged accessories. Spend a little extra on robust, metal mounting solutions from trusted brands like SmallRig or Tilta.
- Start Small, Expand as Needed: You don’t need every accessory from day one. Identify your most pressing needs (e.g., better audio first, then a monitor) and gradually build your kit. This helps manage your budget and avoids overwhelming your setup.
- Test Thoroughly Before Shoots: Always run a full test of your rigged gimbal before a critical shoot. Check all connections, ensure everything is powered up, and perform some test moves to confirm stability and functionality.
- Consider Power Solutions: If you’re adding multiple power-hungry accessories, look into options like V-mount batteries with D-tap splitters or gimbals that offer power outputs to avoid a tangle of individual battery packs.
Conclusion
Rigging your gimbal with external monitors, microphones, and lights is a game-changer for any videographer striving for professional-grade results. By carefully planning your setup, selecting the right accessories, and meticulously balancing your gimbal, you can unlock unparalleled creative control and produce stunning, cinematic footage with superior audio and visual quality. This comprehensive approach transforms your Camera Stabilizer into a versatile mobile studio, ready to capture your vision with precision and flair. So, what’s the first accessory you’ll add to elevate your gimbal setup?
Frequently Asked Questions
How do I balance a heavy monitor on my gimbal?
Balancing a heavy monitor typically requires attaching counterweights to the opposite side of the gimbal’s tilt or roll arm. Many gimbals have specific mounting points for these weights, or you can use extension plates to add them. The goal is to redistribute the weight so the gimbal remains level when the motors are off.
Can I use any microphone on my gimbal?
While you technically can use many microphones, compact shotgun mics or wireless lavalier receivers are generally preferred. Larger, heavier mics can make balancing difficult. Also, avoid microphones that pick up too much gimbal motor noise.
What are the best compact lights for gimbal use?
Look for mini LED panel lights that are lightweight, battery-powered, and offer adjustable brightness and color temperature. Brands like Aputure, Godox, and Lume Cube offer excellent compact options designed for on-camera or gimbal mounting.
Do I need special cables for gimbal accessories?
Yes, using short, flexible, and often coiled cables is highly recommended. Standard-length cables can easily snag, create clutter, and interfere with the gimbal’s movement. Look for specific “gimbal cables” or “coiled cables” for HDMI, audio, and power.
How do I prevent cable snagging on a gimbal?
Cable snagging is a common issue. To prevent it, use the shortest possible cables, employ cable clips or small ties to secure them tightly to the gimbal’s frame, and ensure they have enough slack for the gimbal’s full range of motion without getting caught in motors or joints.