Have you ever finished a brilliant video shoot, only to discover your footage is subtly, or not-so-subtly, tilted? That frustrating lean to the horizon is known as gimbal horizon drift, a common nemesis for videographers seeking perfectly level shots. A camera stabilizer, specifically a gimbal, is an indispensable tool for achieving cinematic smoothness, but even the best can sometimes lose their way. This comprehensive guide will equip you with the knowledge and steps to understand, troubleshoot, and correctly calibrate your gimbal, ensuring your horizons always stay where they belong.
What is a Gimbal and Why Stable Footage Matters
At its core, a camera stabilizer, often referred to as a gimbal, is an electromechanical device designed to provide smooth and stable footage, even when the camera operator is in motion. Modern 3-axis gimbals use brushless motors and advanced sensors to counteract unwanted movements along three axes: pitch (tilt up and down), roll (tilt side to side), and yaw (pan left and right). This intricate system continuously adjusts to keep your camera perfectly level, transforming shaky handheld video into buttery-smooth, professional-grade content.
The pursuit of stable footage is paramount in modern videography. Whether you’re a vlogger, a documentary filmmaker, or shooting a short film, a level horizon is fundamental to visual storytelling. It prevents viewer disorientation, maintains aesthetic appeal, and signals a high level of production quality. When a gimbal malfunctions and the horizon drifts, it undermines the very purpose of this essential equipment.
Understanding Gimbal Horizon Drift: Causes and Symptoms
Gimbal horizon drift manifests as your camera slowly or suddenly tilting to one side, causing the horizon line in your footage to appear uneven or skewed. This can be incredibly frustrating, especially after a long shoot. Recognizing the symptoms and understanding the underlying causes is the first step towards a lasting solution.
The symptoms are straightforward: your video looks like it’s perpetually leaning. The world appears off-kilter, making for an unprofessional and distracting viewing experience. But what causes this unwelcome phenomenon? Several factors contribute to horizon drift:
- Improper Balancing: This is arguably the most common culprit. If your camera and lens setup isn’t perfectly balanced on the gimbal before you power it on, the motors have to work overtime to maintain stability, leading to strain and eventual drift.
- Sensor Misalignment or Errors: Over time, the internal sensors (accelerometers and gyroscopes) that detect movement can become miscalibrated or lose their precise alignment. This can happen due to minor bumps, extreme temperature changes, or simply wear and tear.
- Motor Issues: While less common, a faulty motor or one struggling to operate can lead to an unstable horizon. If the motors are under too much stress from an unbalanced load, they can perform inconsistently. [Search Result 1.1]
- Outdated Firmware or Software Glitches: The gimbal’s firmware acts as its brain. Bugs in older versions or minor software glitches can sometimes cause the horizon to drift.
- Mechanical Tolerances: Even with high-precision manufacturing, tiny mechanical imperfections can exist. Calibration helps the gimbal account for these minute discrepancies.
- Low Battery Power: An undercharged gimbal may not have sufficient power to drive the motors effectively, leading to erratic behavior and drift during operation or calibration.
- Attached Accessories: Adding external microphones, monitors, or lights without re-balancing can throw off the gimbal’s equilibrium, causing it to struggle and drift.
Understanding these causes highlights the importance of proper setup and regular maintenance, not just for fixing drift, but for preventing it.
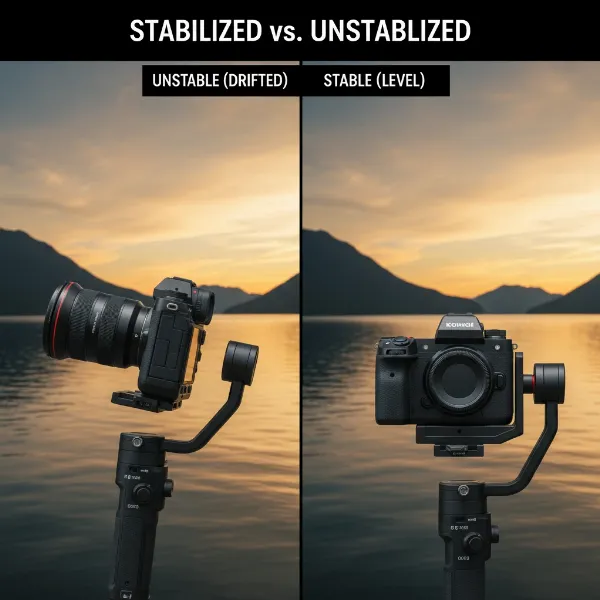 Illustrative image showing a camera on a gimbal with a clearly tilted horizon, contrasted with a perfectly level horizon.
Essential Pre-Calibration Checks for Optimal Gimbal Performance
Before diving into calibration, there are crucial preparatory steps that can often resolve minor drift issues or ensure your calibration process is successful. Skipping these can lead to failed calibration attempts and continued frustration.
First and foremost, ensure your camera is perfectly balanced on the gimbal. This is the single most critical step. With the gimbal powered off and all axis locks disengaged, your camera should ideally remain level in any position you place it. Adjust the gimbal arms (roll, pitch, yaw) and the quick-release plate until the camera holds its position without any motor assistance. If your camera consistently tilts when the gimbal is off, it’s a clear sign of imbalance. For instance, on a Zhiyun Smooth 5, balancing involves unlocking the arm and moving it left or right until the smartphone stays put when the gimbal is off.
Next, check your gimbal’s battery level. Calibration processes require full power for accurate sensor readings and motor adjustments. An undercharged battery can lead to inaccurate calibration or a failed attempt.
Place your gimbal on a flat, stable surface. This ensures the gimbal has a true reference point for its sensors during calibration. A wobbly table or uneven ground will compromise the accuracy of the process.
Remove any unnecessary accessories for the initial balancing and calibration. While accessories will eventually be used, they can complicate the balancing process. Once the gimbal is perfectly calibrated with just the camera, you can re-attach accessories and perform minor re-balancing if needed. Finally, ensure all motor locks are disengaged. Accidentally leaving a motor locked will prevent proper movement and can damage the gimbal during calibration.
Step-by-Step Guide to Correct Gimbal Calibration
Once your gimbal is properly balanced and prepared, you can proceed with calibration. Most modern gimbals offer both automatic and, sometimes, manual adjustment options.
Automatic Gimbal Calibration
|
Our Picks for the Best Camera Stabilizer in 2026
As an Amazon Associate I earn from qualifying purchases.
|
||
| Num | Product | Action |
|---|---|---|
| 1 | FeiyuTech SCORP 3 Gimbal Stabilizer for Camera, Built-in AI Tracking Sensor & Detachable Remote Control, 3.5KG Payload Camera Stabilizer with Touch Screen, Vertical Shooting |

|
| 2 | DJI Osmo Mobile 7P Gimbal Stabilizer for iPhone, Android, Native Tracking, Lighting, 3-Axis Phone Gimbal, Quick Launch, One-Tap Edit, Built-in Extension Rod & Tripod, 10hrs Use, Phone Charging |
|
| 3 | 3-Shoe DSLR/Mirrorless/Action Camera Camcorder Phone Stabilizer Expansion Cage Mount Moviemaking Holder Rig YouTube Tiktok Vlogging Video Kit Compatible with GoPro Canon Nikon Sony iPhone Android |
|
| 4 | DJI RS 3 Mini, 3-Axis Gimbal Stabilizer for Cameras Canon/Sony/Panasonic/Nikon/Fujifilm, 2 kg (4.4 lbs) Tested Payload, Camera Gimbal with Native Vertical Shooting, Black |
|
| 5 | FeiyuTech SCORP 2 Gimbal Stabilizer for DSLR and Mirrorless Camera, Integrated Al Tracking Sensor, 3-Axis Camera Stabilizer for Sony Canon Panasonic Nikon, 2.5kg Payload Touch Screen Vertical Shooting |
|
| 6 | DJI Osmo Mobile 7 Gimbal Stabilizer for iPhone, Android, Built-in Tripod, Portable Stabilizer for iPhone, Selfie Stick, 3-Axis Phone Gimbal, ActiveTrack 7.0, One-Tap Edit, 10hrs Use, Phone Charging |
|
| 7 | DJI Osmo Mobile 8 Advanced Tracking Combo Gimbal Stabilizer for Phone, AI Native Tracking with Audio & Lighting, 360° Pan Rotation, Built-in Extension Rod & Tripod, 10h Battery, Extension Rod |
|
| 8 | ZHIYUN CINEPEER Weebill 3E [Official], 3-Axis Lightweight Gimbal Stabilizer for DSLR & Mirrorless Camera Canon/Sony/Panasonic/Nikon, 3KG Payload, Native Vertical Shooting, Bluetooth Shutter Control |
|
| 9 | Zeadio Camera Stabilizer Kit, All-in-One Handheld Stabilizer with LED Video Light, Microphone, Phone Holder & Action Camera adaper, Fits for All Camera, DSLR, Action Camera and All Smartphones |
|
| 10 | Zeadio Video Action Stabilizing Handle Grip Handheld Stabilizer with Cold-Shoe Mount for All DSLR Camera Camcorder |
|
Automatic calibration is the go-to method for most users and typically resolves horizon drift. The process can vary slightly by brand (DJI, Zhiyun, FeiyuTech, etc.) but generally follows these steps:
- Power On and Connect: Turn on your gimbal and, if applicable, connect it to its dedicated smartphone app (e.g., DJI Mimo, DJI Pilot 2). For gimbals with built-in screens, navigate directly through the menu.
- Access Calibration Settings: In the app, look for a “Gimbal Settings” or “System Settings” icon. Within this menu, you should find an option labeled “Gimbal Auto Calibration” or “Motor Calibration.”
- Initiate Calibration: Select the auto-calibration option. The app or gimbal screen will usually prompt you to place the gimbal on a flat, level surface.
- Start and Do Not Touch: Tap “START” or confirm to begin the calibration. It is absolutely crucial not to touch or move the gimbal during this process. The gimbal will rotate and jiggle on its own as it recalibrates its motors and sensors. This process usually takes about 20-30 seconds. [Search Result 1.3]
- Confirmation: Once complete, you’ll receive a success message. Test your gimbal by moving it around and checking if the horizon remains level.
This automatic process fine-tunes the gimbal’s sensors and motor responses, compensating for any minor misalignments that have developed.
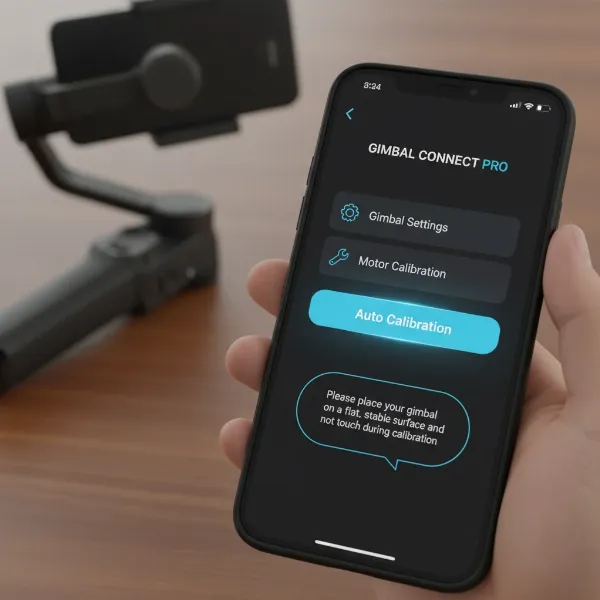 A smartphone screen displaying a gimbal's mobile app interface, with a clear "Auto Calibration" button highlighted and a prompt to place the gimbal on a flat surface.
Manual Horizon Adjustment Techniques
Sometimes, auto-calibration isn’t enough, or you need to fine-tune the horizon to your exact preference. Many gimbals offer manual adjustment capabilities:
- In-App Horizontal Adjustment: For some gimbals, like certain DJI Osmo models or the RS2, the companion app provides a “Horizontal Gimbal Adjustment” slider or numerical input. This allows you to manually correct a slight tilt to the left or right, even after auto-calibration. You can dial in the exact tilt needed to achieve a perfectly level horizon.
- Joystick Calibration (e.g., DJI Ronin SC): Specific button combinations on certain gimbals can trigger a joystick calibration mode. For instance, on a DJI Ronin SC, pressing and holding the trigger button four times until the LEDs blink, then rotating the joystick clockwise and counter-clockwise multiple times, can calibrate the stick and fix drift issues. Continue rotating until the LEDs turn solid green, indicating successful calibration.
- Advanced PID Tuning: This is typically for professional users or those with custom-built gimbals. PID (Proportional-Integral-Derivative) parameters control how the gimbal motors respond to movements. Adjusting these values (P, I, D gains) can fine-tune the motor strength and responsiveness for each axis. While powerful, this requires a deep understanding and can introduce more problems if done incorrectly. (Search Result 3.4)
“Properly balancing your camera before calibration is like teaching your gimbal to walk straight from birth. It makes all subsequent corrections much easier and more effective.” – Admin, StabilizerPro.com, Camera Stabilizer Expert.
Troubleshooting Persistent Gimbal Drift Issues
If your gimbal continues to drift after multiple calibration attempts, it’s time to dig a little deeper. Persistent horizon drift can indicate a more complex problem, but several troubleshooting steps can still help.
Firstly, re-evaluate your camera balance with extreme precision. Even a millimeter off can make a difference over time. Try different lenses or camera setups if you have them, isolating whether the issue is with a specific combination. Ensure all accessories are removed during this test.
Next, check for firmware updates again. Manufacturers frequently release updates that address bugs, improve stability algorithms, and enhance calibration processes. Perform the update via the official app or desktop software if available. Sometimes, even reinstalling the current firmware can resolve software glitches.
Inspect your gimbal for any physical damage. Look for bent arms, loose screws, or any obstructions in the motor’s path. Sometimes, a hard knock can misalign internal components that even calibration can’t fully correct. If you suspect physical damage or a motor malfunction (e.g., a motor not moving freely or making unusual sounds), it might be beyond a user-fixable solution.
If all troubleshooting fails, contact the manufacturer’s customer support. Provide them with a detailed description of the problem, the steps you’ve already taken, and any relevant footage showing the drift. Many brands offer repair services or specific diagnostics tools that aren’t publicly available.
Maintaining Your Gimbal for Long-Term Horizon Stability
Preventing horizon drift is always better than fixing it. Implementing a routine maintenance schedule can significantly extend the life and reliability of your gimbal.
Regularly perform a balance check before every major shoot. Even if you’re using the same camera setup, tiny shifts can occur during transport. Taking an extra minute to ensure perfect balance will save you hours in post-production.
Conduct periodic automatic calibrations. Make it a habit to calibrate your gimbal once a month or after any significant change in environment (e.g., traveling from a cold climate to a hot one), even if you don’t perceive any drift. This keeps the sensors finely tuned.
Keep your gimbal’s firmware updated. Treat firmware updates like software updates on your phone or computer. They often contain critical performance enhancements and bug fixes that directly impact stability.
Store your gimbal properly. When not in use, ensure it’s stored in its protective case, ideally with all axes locked. This prevents accidental knocks or pressure on the motors and arms that could lead to misalignment. Avoid extreme temperatures or humid environments.
Finally, clean your gimbal regularly. Dust and grime can accumulate in the joints and around the motors, potentially hindering smooth operation. Use a soft, dry cloth to wipe down the surface, and ensure no debris gets into moving parts.
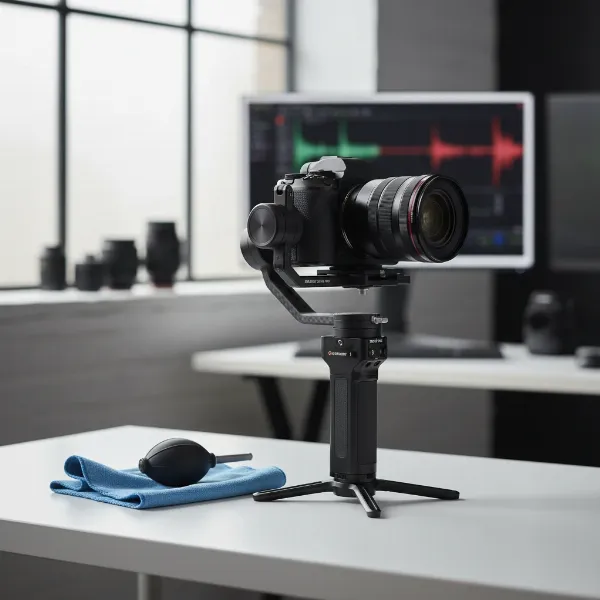 A well-maintained camera gimbal, possibly on a stand, with cleaning tools nearby, suggesting proper care and storage.
Choosing a Gimbal: Features That Prevent Horizon Drift
When investing in a new gimbal, or evaluating your current one, certain features contribute significantly to preventing horizon drift and ensuring stable performance.
Look for gimbals with robust motor systems and a high payload capacity that comfortably handles your camera setup. Overloading a gimbal is a direct path to drift. Gimbals with powerful, responsive motors are less susceptible to struggling under slight imbalances.
Advanced stabilization algorithms are also key. Higher-end gimbals from brands like DJI (Ronin series) and Zhiyun (Crane/Weebill series) often feature more sophisticated algorithms that can better anticipate and counteract movements, leading to inherently more stable footage. These often come with dedicated apps offering extensive customization and fine-tuning options.
Consider gimbals that offer precise manual balancing mechanisms with clear markings or quick-release plates that aid in repeatable setups. Some gimbals even have intelligent auto-tune features that adjust motor strength based on your camera’s weight, further optimizing performance.
Lastly, good software support and frequent firmware updates from the manufacturer are vital. A company that actively supports its products with updates is more likely to address and resolve potential drift issues through software refinements.
Expert Advice: Keeping Your Horizons Level
As a technician with over a decade of experience in camera stabilizers, the most crucial advice I can offer for combating horizon drift is consistent vigilance. Don’t wait for your footage to look off-kilter; make proactive checks and calibration a regular part of your pre-shoot routine.
Always prioritize perfect mechanical balance before powering on your gimbal. This fundamental step cannot be overstated. An unbalanced gimbal is fighting an uphill battle, rapidly draining battery life and increasing the likelihood of sensor errors and drift. Think of it as tuning an instrument; if the basic setup isn’t correct, no amount of digital correction will make it sound perfect.
Secondly, familiarize yourself with your specific gimbal’s calibration process. While general steps are universal, each model has its nuances, whether it’s a specific button sequence or an app interface. Mastering these specifics will allow you to quickly and effectively address any drift issues that arise. The investment of time in learning your gear is an investment in flawless footage.
Finally, remember that gimbals are precision instruments. Treat them with care, avoid unnecessary bumps, and maintain them diligently. A well-cared-for gimbal will reward you with years of perfectly stable, level horizons.
Conclusion
Gimbal horizon drift can be a frustrating obstacle, transforming expertly planned shots into tilted mishaps. However, with a clear understanding of its causes, diligent pre-calibration checks, and a methodical approach to calibration—both automatic and manual—you can effectively troubleshoot and eliminate this issue. By prioritizing proper balancing, staying updated with firmware, and maintaining your equipment, you empower your Camera Stabilizer to deliver the smooth, professional, and perfectly level footage you strive for.
What has been your most challenging experience with gimbal drift, and how did you overcome it?
Frequently Asked Questions
Why does my gimbal keep drifting even after calibration?
Persistent drift usually points to an underlying issue beyond simple sensor misalignment. Double-check your camera’s balance meticulously, ensuring it holds its position perfectly when the gimbal is off. Also, verify your gimbal’s firmware is updated and inspect for any physical damage or loose components that might be affecting motor performance.
How often should I calibrate my camera gimbal?
It’s good practice to calibrate your gimbal whenever you notice a slight tilt in your footage or after any significant bumps or environmental changes. Many professionals also perform a quick auto-calibration periodically (e.g., monthly) or before critical shoots as part of their routine maintenance, even if no drift is apparent.
Can low battery cause gimbal horizon drift?
Yes, a low battery can absolutely contribute to horizon drift. Gimbals require consistent power to drive their motors and accurately process sensor data. When the battery is weak, the motors might struggle to maintain position, leading to erratic behavior, including horizon drift and failed calibration attempts. Always ensure your gimbal is fully charged before use and calibration.
Is manual balancing really that important if my gimbal has auto-calibration?
Absolutely. Manual balancing is paramount because it reduces the strain on your gimbal’s motors. If the camera is perfectly balanced manually, the motors only need to make minor adjustments, leading to smoother, more stable performance, extended battery life, and less likelihood of horizon drift, even with auto-calibration. Auto-calibration refines sensor data; it doesn’t compensate for a fundamentally unbalanced load.
What’s the difference between auto-calibration and motor calibration?
Often, “auto-calibration” and “motor calibration” refer to the same process where the gimbal automatically analyzes its internal sensors and motor responses to achieve optimal stability. However, some advanced systems might have a separate “motor calibration” that specifically tunes individual motor power, while “auto-calibration” handles overall sensor alignment. Always follow your gimbal’s specific instructions.
My gimbal vibrates after calibration. What should I do?
If your gimbal vibrates after calibration, it could indicate that the motors are either too strong or too weak for your camera setup, or that there’s an issue with balancing. First, re-check your physical balance meticulously. If vibration persists, some gimbals allow adjustment of motor strength settings in their app, which you might need to fine-tune to match your camera’s weight.
Can environmental factors affect gimbal calibration?
While less common, extreme environmental factors like significant temperature changes or strong magnetic interference could potentially affect gimbal sensor performance and calibration accuracy. It’s always best to perform calibration in a stable, neutral environment whenever possible. If you frequently shoot in extreme conditions, periodic recalibration might be necessary.